
Magento 2 shipping is an exciting feature which allows users to access many beautiful options. In detail, when enabled, it supplies the Magento Sales menu with Dispatch & Batches options and the Stores menu with a Shipping section.
Also, new sections of detailed information are added in each shipment. In the frontend, the available Magento Shipping options will be displayed on the checkout page for customers to select.
However, the process may be tricky to you as it entails a range of stages. In this tutorial, you’ll be guided to activate Magento 2 Shipping in 5 minutes by step-by-step instruction. Follow us and get it done.
Step 1: Generate Your API Tokens
In the Magento Shipping Portal, sign in to your account. Your Magento account ID determines both of the Magento account and Magento Shipping account; these two accounts are required to access the Portal. Apply the information from your Magento Shipping account to have the configuration in the Admin completed.
1/ In the header, click the question mark (?) to hide the Welcome message and Getting Started steps.
2/ In the Account section, check your API Endpoint and Account ID. This data is required for your Magento configuration.
 A unique API token will be used to recognise the connection between your Magento site and your Magento Shipping account.
3/ Click Generate Token for the sort of token needed in the API Tokens section:
- Production API Token – creates a required API token to utilise Magento Shipping in production mode.
- Test API Token – creates a needed API token to utilise Magento Shipping in test mode.
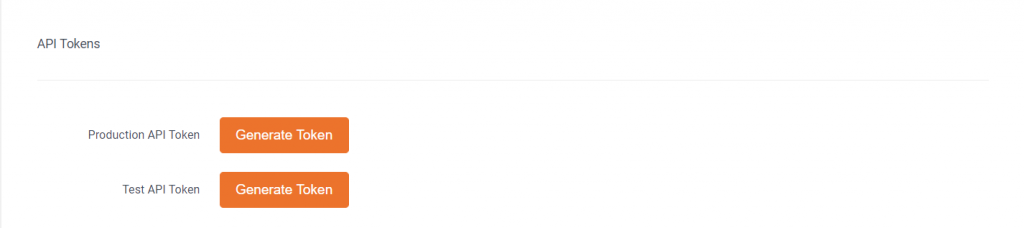
For the first-time setup, select Test API Token. When you are fully prepared to use Magento Shipping, the Production API Token can be in use. Then, paste the token into the Magento configuration.
Step 2: Enable and Configure Magento Shipping
1/ Go to another browser tab or window and sign in to the Magento Admin.
2/ Go to Stores > Settings > Configuration on the Admin sidebar
3/ Get the Sales section expanded and select Shipping Methods in the left panel
4/ Get the Magento Shipping section expanded and configure the connection to your enabled account:
- Set Enabled to Yes.
- Type the Title that you want.
- Set Enable API Logging to Yes to activate logging for all API communication. Only API errors are logged by default.
- Add Magento Shipping account API credentials (from the open browser tab or window) to your Magento configuration:
– API Endpoint
– Account ID
– API Token - Ensure that you create and copy the test token instead of the production token to apply Magento Shipping in a testing environment
5/ (Optional) Configure customer shipping options:
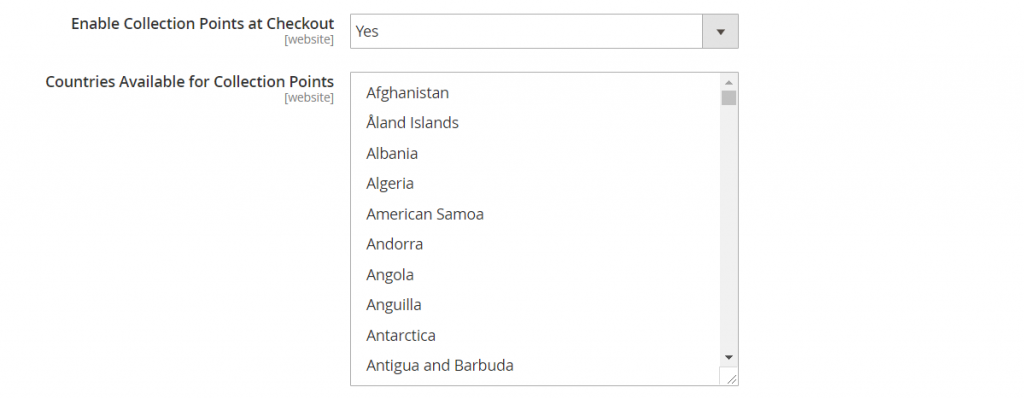
- To give customers an option to have the shipment delivered to a designated place other than to address, set Enable Collection Points at Checkout to Yes.
- Choose each country where such alternate collection points are available. To choose multiple countries, hold down the Ctrl key (PC) or the Command key (Mac) and click each.
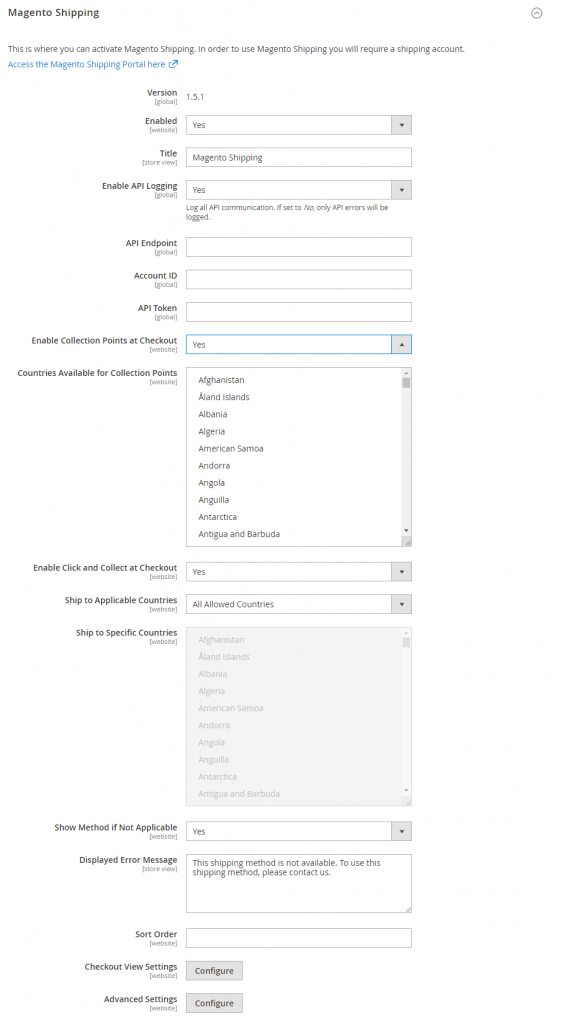
6/ Set Enable Collection Points at Checkout to Yes to allow customers to pick up the order a designated location when purchasing.
7/ Finish the following settings if necessary.
- Set Ship to Applicable Countries to either of the following:
– All Allowed Countries – Customers from all specified countries can utilise Magento Shipping.
– Specific Countries – Decide each country on the list where Magento Shipping can be utilised. (Hold down Ctrl and click each country.) - Set Show Method if Not Applicable to either of the following:
– Yes – Displays this shipping method at all times.
– No – Displays this shipping method only when applicable. - In the Displayed Error Message box, type the message to show up if Magento Shipping becomes unavailable.
- To decide the position of the method in the list of shipping methods during checkout, choose a Sort Order number (0 = first, 1 = second, 2 = third, and so on.)
8/ Click Save Config.
Step 3: Complete The Remaining Settings
The following design settings can be finished now, or later. At the point when either of these extra configurations is finished, click Save Config.

Checkout View Settings
The Checkout View Settings decide the options that show up as add-on delivery ones during checkout.
![]()
1/ To configure the Checkout View Settings, click Configure

2/ Choose the checkbox of every section that you want to show up during checkout. At that point, finish the data in each section if necessary.
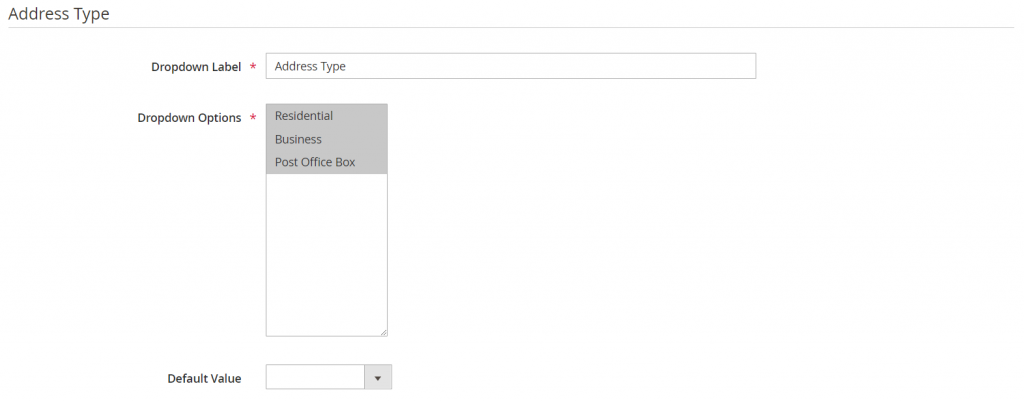
3/ In Address Type, follow these steps:
– For Dropdown Label, type the content that you want to show for the address type label options during checkout.
– For Dropdown Options, choose every option that you want to have as an address type.
– For Default Value, select the address type option that you want to be utilised as the default.

4/ In the Authority to Leave section, type the text that you want to display for the checkbox label for this option
 5/ In the Signature Required section, type the text that you want to display for the checkbox label for this option.
6/ Click Save.
Advanced Settings
The following settings are required to synchronise your store with the Temando API and empower batch processing.
![]()
1/ Choose Configure to configure the Advanced Settings.
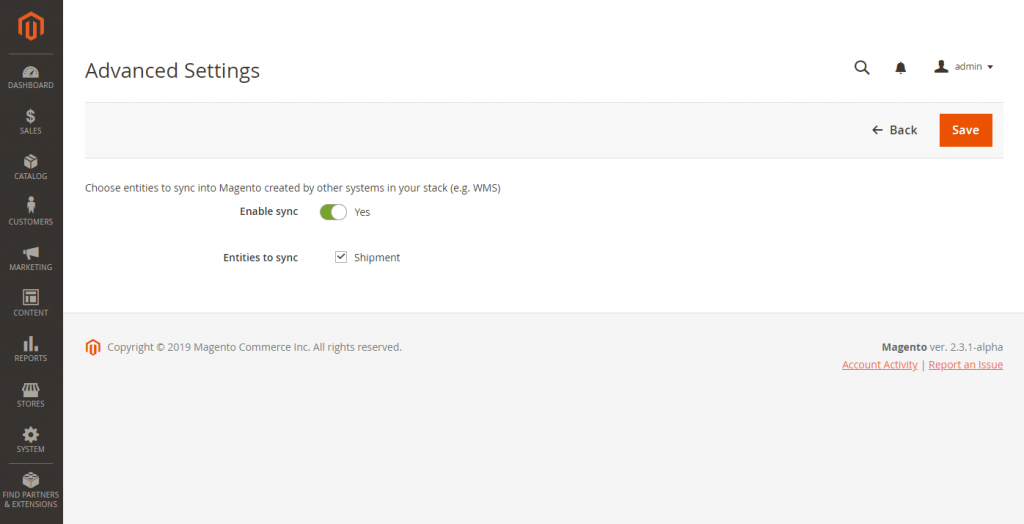
2/ Set Enable sync to Yes to synchronise Magento with different systems in your stack.
3/ Choose the Shipment checkbox to synchronise shipment entities.
4/ Click Save.
Step 4: Complete the Shipping Profiles
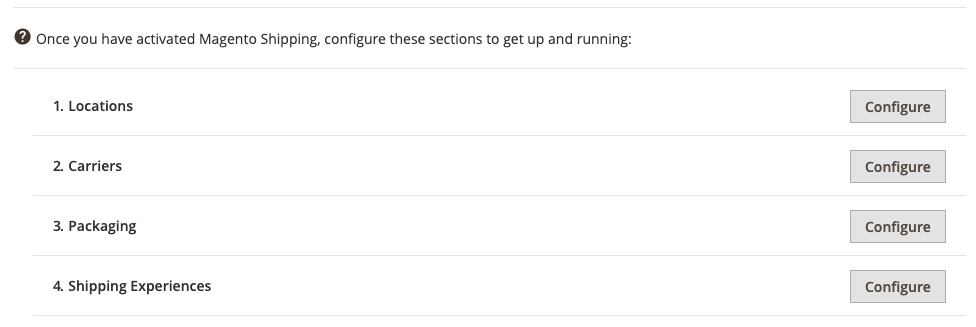
The last stage is to finish the Location, Carrier, and Package shipping profiles in the Magento Shipping Portal. After these profiles are finished, make Shipping Experience Rules to include logic and computerise parts of your shipping workflow.
At the point when the initial configuration is finished (Steps 1-3), you can get to the Magento Shipping Portal right from the Magento Admin. You can utilise any of the following techniques to get to and complete the shipping profile information from the Magento Admin.
Method 1 – Menu Options
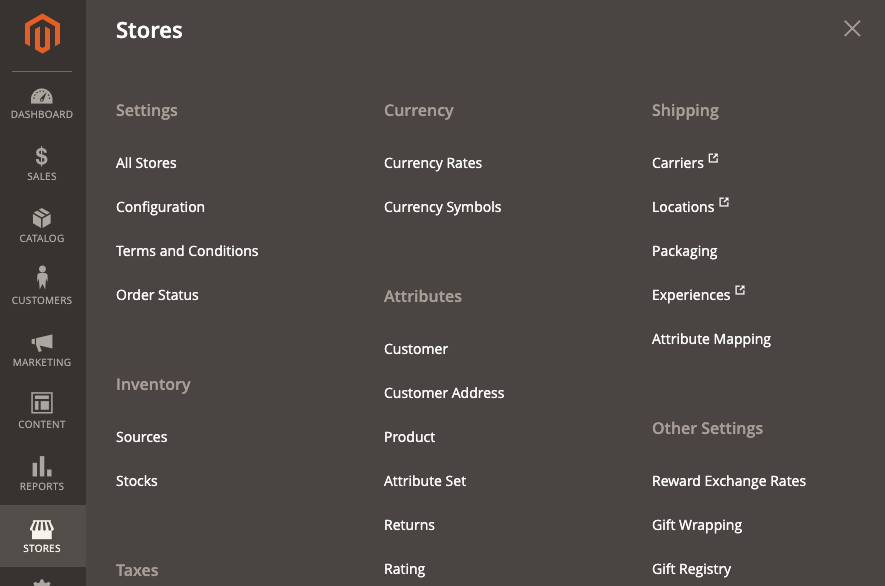
Click Stores on the Admin sidebar and select one of the following Shipping sections:
- Carriers
- Locations
- Packaging
- Experiences
- Attribute Mapping
Method 2 – Configuration
- Navigate to Stores > Settings > Configuration.
- Expand the Sales section and choose Shipping Methods in the left panel.
- Go to the Magento Shipping section and configure the shipping profile settings.
- Complete each profile by choosing Configure.
- Abide by the guidelines to complete the Location, Carrier, and Package information.
- When the profiles are completed, make Shipping Experience Rules to add logic and automate parts of your shipping workflow.
Conclusion
As can be seen, the process involves a large number of steps, and it doesn’t seem very easy. So you need to go through all of them as carefully as possible to successfully activate Magento 2 Shipping.
We hope that the tutorial is informative and supportive enough for you. If you have any further questions or suggestions, let us know in the comment section below.
In case you want to get to know more about Magento, click here for more tutorials and instructions.
Read more: