
Table Rate Shipping is one of basic shipping method available in Magento 2. Unlike Flat Rate Shipping, the charge of this method is flexible and depends on several couples of data about an order. They might be: Weight v. Destination, Price v. Destination or # of Item v. Destination.
Table Rate shipping method allows you to help your customers save a great deal of shipping charge on each order. To apply this method, admin must prepare a spreadsheet that contains data to calculate the shipping fee. The data is then imported in your e-commerce site. Consequently, when information about customers’ order is submitted, the shipping fee will be shown immediately in the shipping estimate section of the shopping cart before checkout.
Please note that more than one couple of data cannot be applied at the same time.
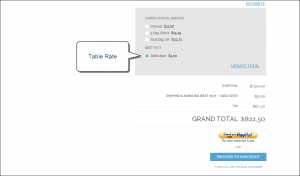
Table Rate in Shopping Cart
Let’s take a look at how to configure Table Rate Shipping:
STEP 1: Complete the Default Configuration
This step is the first thing needed to complete before turning on Table Rate Shipping. It can be done without changing the extent of settings.
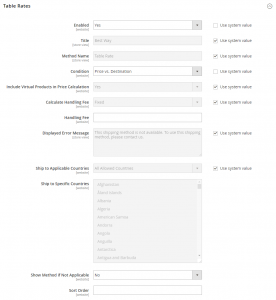
Table Rates
- Look for Stores on the left-side bar of Admin homepage, click Configuration below Settings.
- In Sales section, choose Shipping Methods, scroll down and find Table Rates.
- Expand this section and complete the fields as following:
a. Choose “Yes” at Enabled.
b. Enter or paste the Title which will appear on screen to choose when checkout. In Magento 2, the default name of Table Rate Shipping is “Best Way”.
c. Enter or paste the Method Name to describe clearly how the Table Rate Shipping works with orders.
d. Choose one of three calculation methods that is the most suitable for you:
- Weight v. Destination
- Price v. Destination
- # of Items v. Destination
e. If your store contains virtual products such as services or e-voucher, you can choose “Yes” in the Include Virtual Products in Price Calculation box.
This action is to control the result of calculation if admin choose Price v. Destination or # of Item v. Destination condition. You do not need to do this if your result is based on the Weight v. Destination condition because the weight of virtual products is zero.
f. The Calculate Handling Fee box is used to control your additional handling fee. There are 2 options to choose:
- Fixed
- Percent
In the Handling Fee, admin need to enter the rate based on the chosen Calculate Handling fee. If admin chooses “Percent”, enter the entire number without the “%” symbol such as “0.05” or “0.1”. If admin chooses “Fixed”, enter the amount of fee there.
g. Enter or paste the Displayed Error Message box to create a message box notifying customers in case Flat Rate Shipping is not available.
h. In the Ship to Applicable Countries box, choose “Specific Countries” and select each country that can apply Flat Rate Shipping or click “All Allowed Countries” to allow customers from all countries in your store settings to be offered this shipping method.
i. In the Sort Order box, enter a number to arrange the order of Free Shipping option in a list of methods. For example: 0 for the first, 1 for the second, etc.
4. Click Save Config to complete.
STEP 2: Prepare the Table Rate Data
- Click the Store View situated in the upper-left corner of your screen, choose “Main Website” or any other site that you want the Table Rates applied. Click OK to confirm. After that, in the Table Rates, there will be Import and Export function.

Export CSV
The “Use Default” have been chosen to save admin’s time. If you want to adjust any option, just clear the “Use default” next to that option, then enter your own settings and remain the other things.
2. In the Condition box, the default option is Price vs. Destination. You can clear the “Use Default” and choose other option that is most suitable for you.
3. Click “Export CSV” in the Export box to download a sample file to your computer. This file names tablerates.csv.
4. Open the file in a spreadsheet.
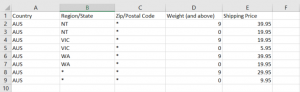
Weight v. Destination sample file
Then complete the sheets by your data following the sample values. This data is to calculate your shipping charge based on each couple of condition. There are some points that admin needs to consider:
- Use an asterisk (*) at any sheet that can be applied for all values.
- In each row of the Country column, admin must enter a three-character code that represents a country.
- In the Region/State column, admin must place locations following an order from specific to wildcard that marks “*”. This action is to ensure the calculation will use the correct factor.
5. Save your tablerates.csv file to finish this step.
STEP 3: Import the Table Rate Data
- Back to your Store View option that apply Table Rate Shipping.
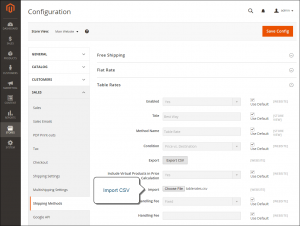
Import Table Rates
2. In the Import box, click “Choose File” to upload your tablerates.csv file to your store.
3. Click Save Config to complete.
STEP 4: Verify
This action is to ensure the Table Rate Shipping works well in your Magento store. To do this, go back to Frontend site and try different customers’ addresses and check whether the shipping charges are correct or not.
Below is some examples about Table Rate Shipping in Magento 2.
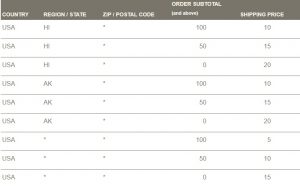
Example 1: Price v. Destination condition
The shipping charge in this example is calculated based on the total value of an order and its destination to each location in the United States. As mentioned before, any sheet marked (*) will be available for all values.
Example 2: Weight v. Destination
Like the previous example, the shipping charge in this example is calculated based on the total weight of an order and its destination to each location in the United States. Any sheet marked (*) will be available for all values.

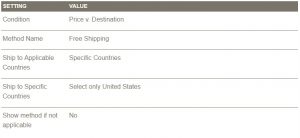
Example 3: Prioritize Free Shipping method to the United States
This example is to instruct you to restrict the Free Shipping option around the United States in Table Rates Configuration.
- Complete a tablerates.csv file as normally. This file will contains the states that you want your Free Shipping program applied.
- Complete the field in Table Rates settings as following:
3. Back to your Store View option that apply Table Rate Shipping. Import your tablerates.csv file.
4. Click Save Config to complete.