Before actually using software, developers must give it a trial run to ensure the product and code quality. Among various kinds of testing, unit testing is considered to be important and extremely helpful for such purposes.
The problem of how to effectively and accurately operate such tests is not simple at all.
Specifically, if you’re a Magento user, this instruction is for you.
In this article, we will provide an overview and reasons why you should use PHP Unit Testing.
Later on, how to use Magento 2 Unit Testing will be clarified, which includes writing unit tests, running tests and some common errors.
(Need more instructions for Magento? Find out on Mage Guides)
What Is Unit Testing?

Before anything, you have to understand what unit testing is.
Unit testing is automated tests run by program developers, in which every component of the software will be checked. This process helps to ensure whether the software will perform as expected or not.
Unit testing processes separately and automatically without any manual handling.
And in Magento 2, what do we have for such a feature?
Don’t worry since an automated testing framework for PHP, which is called PHPUnit, is already included. This PHPUnit behaves as one of the dependencies in Magento 2.
And Magento 2 PHP Unit Testing is quite popular among developers nowadays.
Why Should You Use Magento 2 Unit Testing?

The unit is the smallest testable part. Therefore, when operating unit testing, developers will come into many difficulties.
So the question is: “Is it worthwhile to make efforts?”
The answer is YES for several reasons.
Firstly, though testing every small component of the software is extremely complicated, it will shorten the resolving time. The problems will be identified at the beginning; hence, it’s easier to fix things.
Secondly, it will help to facilitate changes. Unit testing enables programmers to restructure code or upgrade the system later but still, make sure that the module behaves accurately. For this reason, if changes cause faults, it will be identified quickly.
Moreover, it helps to think carefully before actually design the program. The very first thing before writing code is writing the test. Therefore, while writing the test code, you can easily imagine the purpose of designing your products.
Now you realize it beneficial! Why don’t you get started with us?
Writing A Simple Unit Test in Magento 2
Let’s get started with the very first step of Magento 2 Unit Testing, which is writing a unit test.
Suppose that we have:
- A custom module named Testing under Inchoo namespace (app/code/Inchoo/Testing)
- The unit tests will reside inside Test/Unit folder
- Testing class is SampleClass and reside in Testing Class folder
- The whole path: -app/code/Inchoo/Testing/TestingClass/SampleClass
The code will look like this:
<?php
namespace Inchoo\Testing\TestingClass;
class SampleClass
{
    public function getMessage()
    {
        return 'Hello, this is sample test';
    }
}
?>
Our test that will test getMessage() will look like this:
<?php
namespace Inchoo\Testing\Test\Unit;
use Inchoo\Testing\TestingClass\SampleClass;
class SampleTest extends \PHPUnit\Framework\TestCase
{
    /**
     * @var Inchoo\Testing\TestingClass\SampleClass
     */
    protected $sampleClass;
    /**
     * @var string
     */
    protected $expectedMessage;
    public function setUp()
    {
        $objectManager = new \Magento\Framework\TestFramework\Unit\Helper\ObjectManager($this);
        $this->sampleClass = $objectManager->getObject('Inchoo\Testing\TestingClass\SampleClass');
        $this->expectedMessage = 'Hello, this is sample test';
    }
    public function testGetMessage()
    {
        $this->assertEquals($this->expectedMessage, $this->sampleClass->getMessage());
    }
}
Running Unit Test in Magento 2 with 2 Simple Methods
After successfully writing the test code, the next thing you need to do is operating it.
In this section, we will provide tutorials of 2 ways to run Magento 2 PHP Unit Testing, which is CLI, IDE Integration (PHPStorm).
Running Unit Tests in CLI
Running All Tests
Execute the following command if you want to run all unit tests. Please make sure to navigate to the Magento base directory before executing:
<?./vendor/bin/phpunit -c dev/tests/unit/phpunit.xml.dist
Running Subset
To run only tests within a specific branch, you have to specify the directory branch after the command.
You can take the following command as an example. This example tells PHPUnit to look for any file ending with Test.php within the branch app/code/Example/Module/Test/Unit and try to execute it:
<?./vendor/bin/phpunit -c dev/tests/unit/phpunit.xml.dist app/code/Example/Module/Test/Unit
Running Unit Tests in PHPStorm
You can follow these simple steps below to run unit tests in PHPStorm.
STEP 1: Configuring The PHP Interpreter
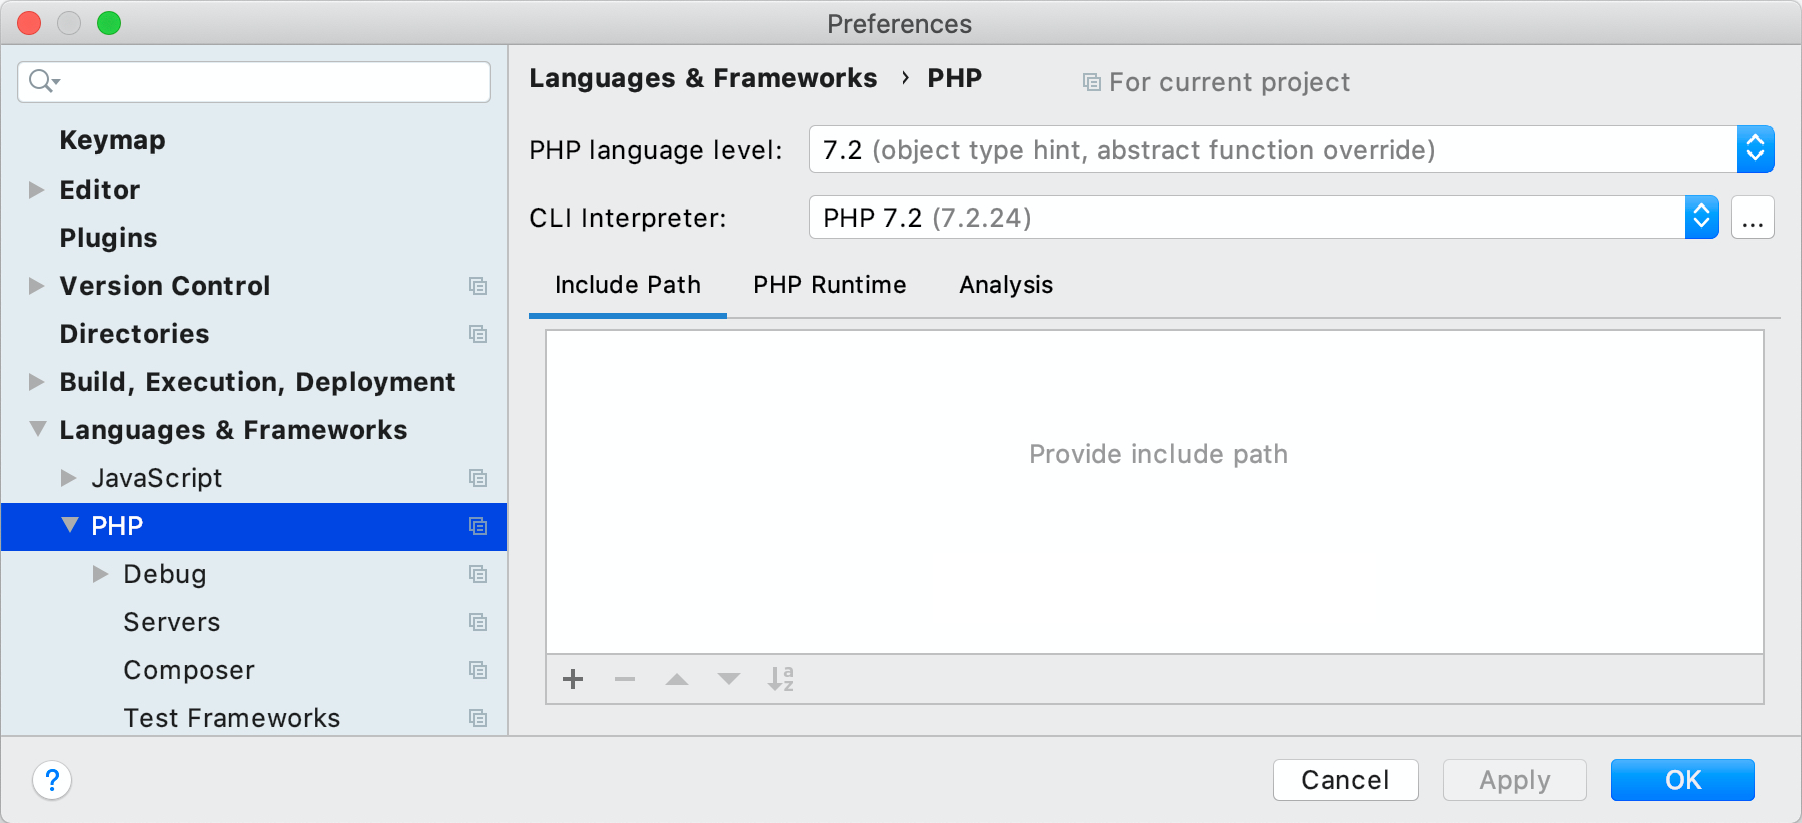
In the PHP preference, please select the PHP interpreter PHPStorm should use to run tests with.
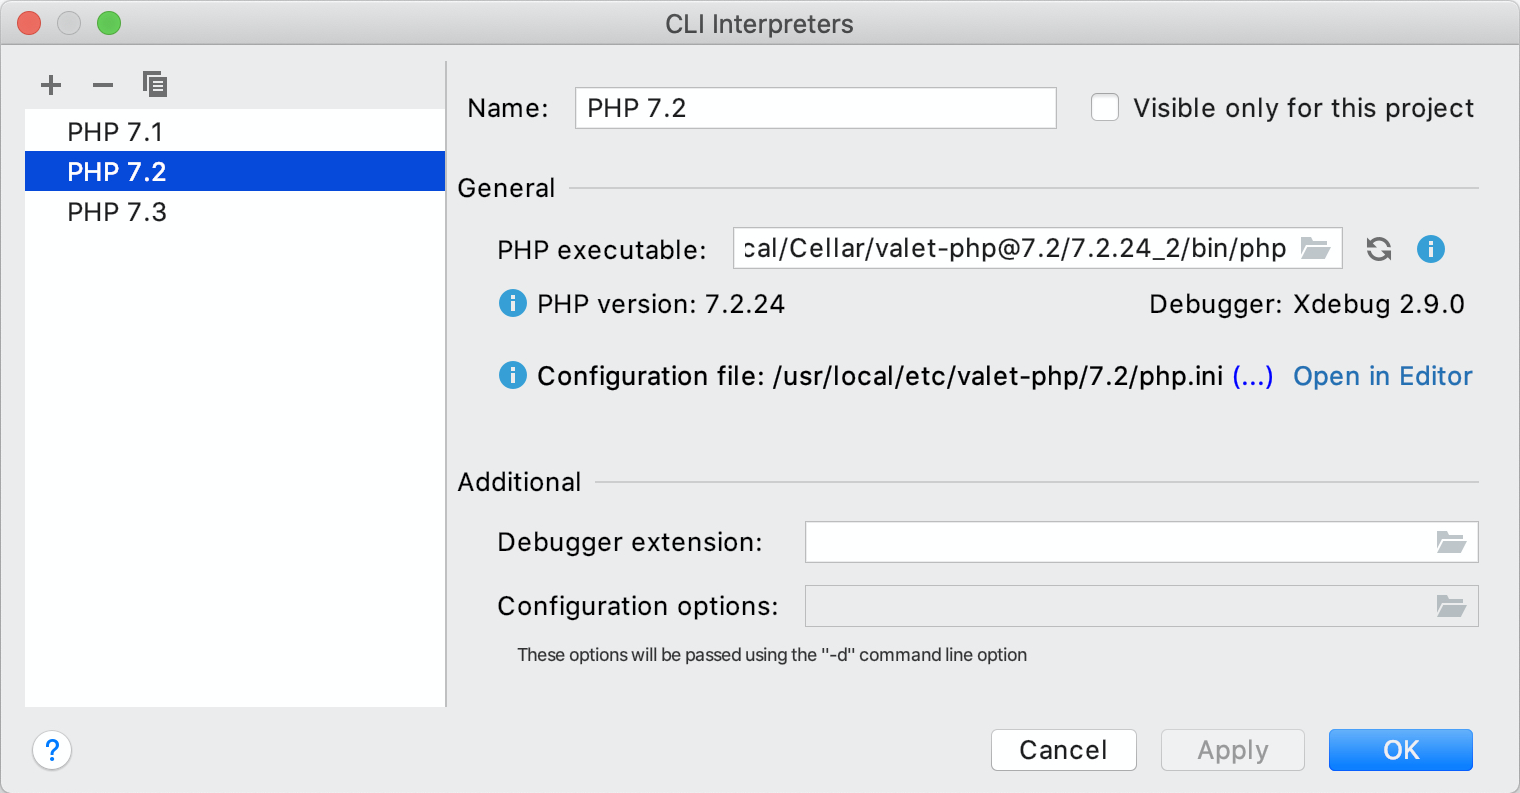
Or you can add one by clicking on the 3 dots sign beside the dropdown. Then, please click (+) button at the top right to select the PHP interpreter.
STEP 2: Configuring PHPUnit
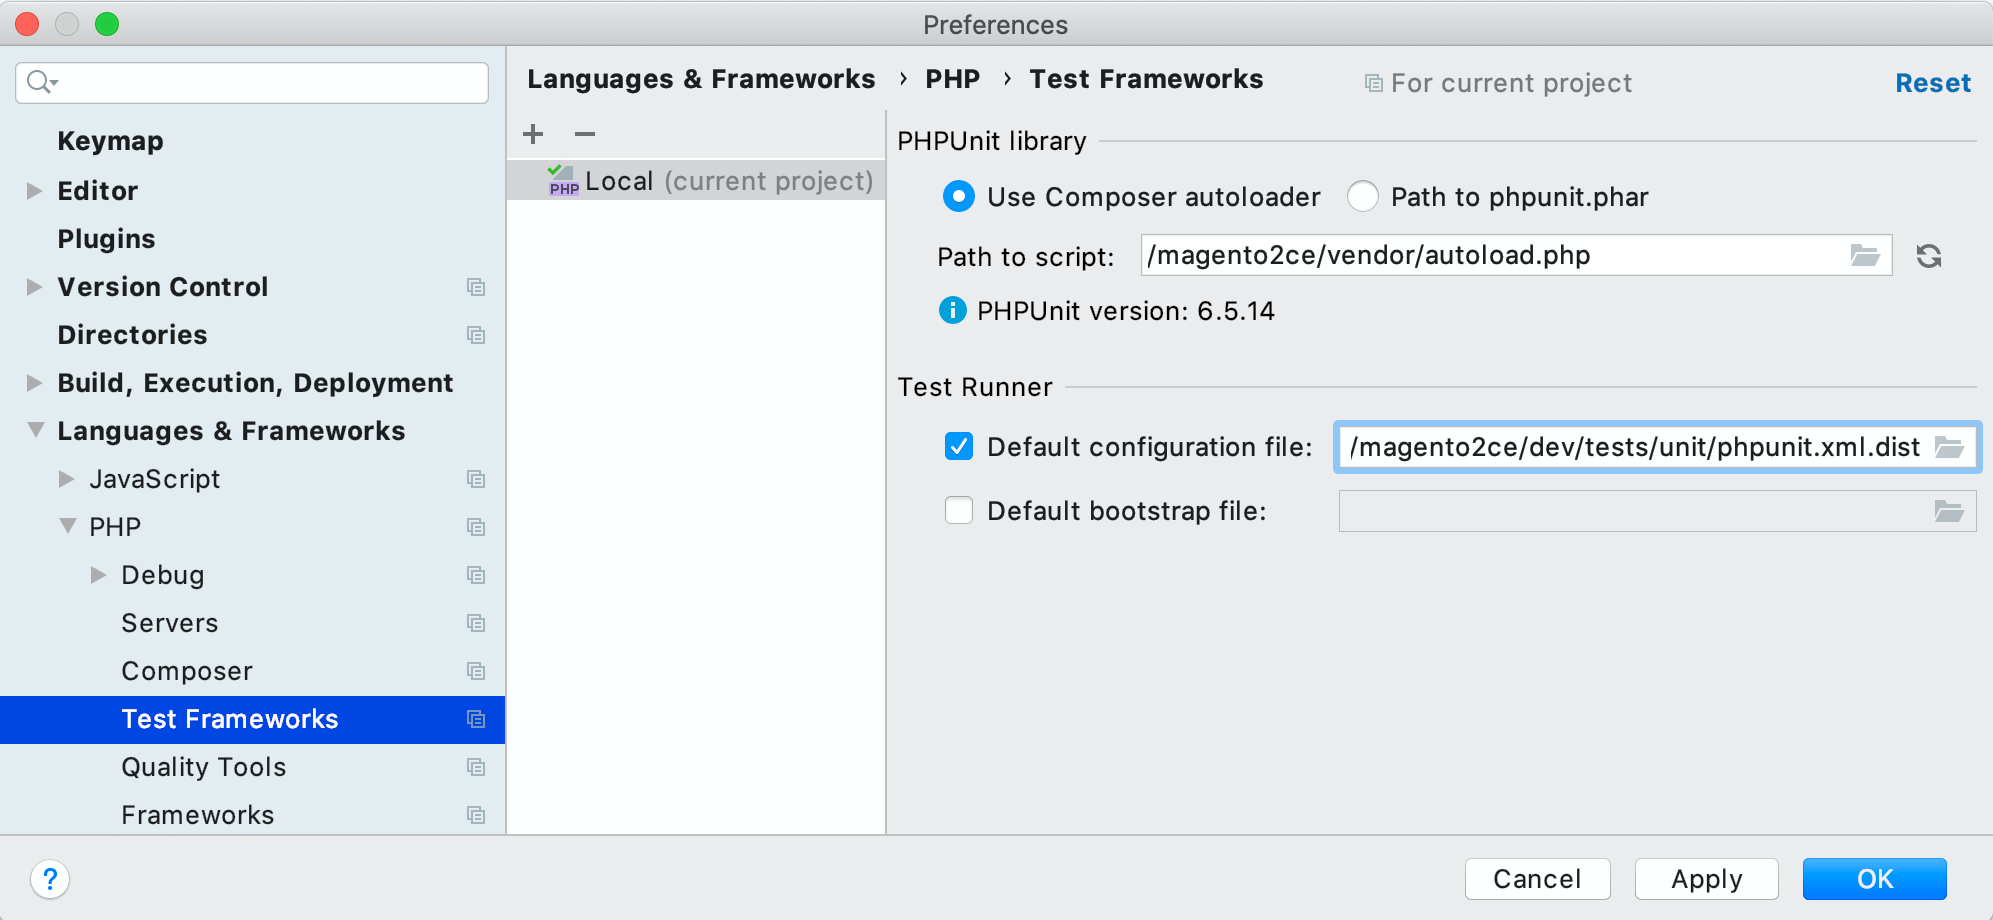
Move to the next step.
The next step is to set up PHPStorm preferences. This step requires several simple manipulations as follows:
- Choose Use Composer autoloader option
- Select the vendor/autoload.php file in your Magento 2 installation
- Select the dev/tests/unit/phpunit.xml.dist as the Default Configuration File (Optional)
STEP 3: Creating A Run Configuration
There are several ways to implement this final step. Here below will present one of those.
First of all, you need to create a new run configuration:
- From the top menu, choose Run > Edit Configuration
- Click (+) from the top right and choose PHPUnit
From this point, there are different processes for specific purposes. Please scroll down to find the one that is best suitable for you.
Running all tests
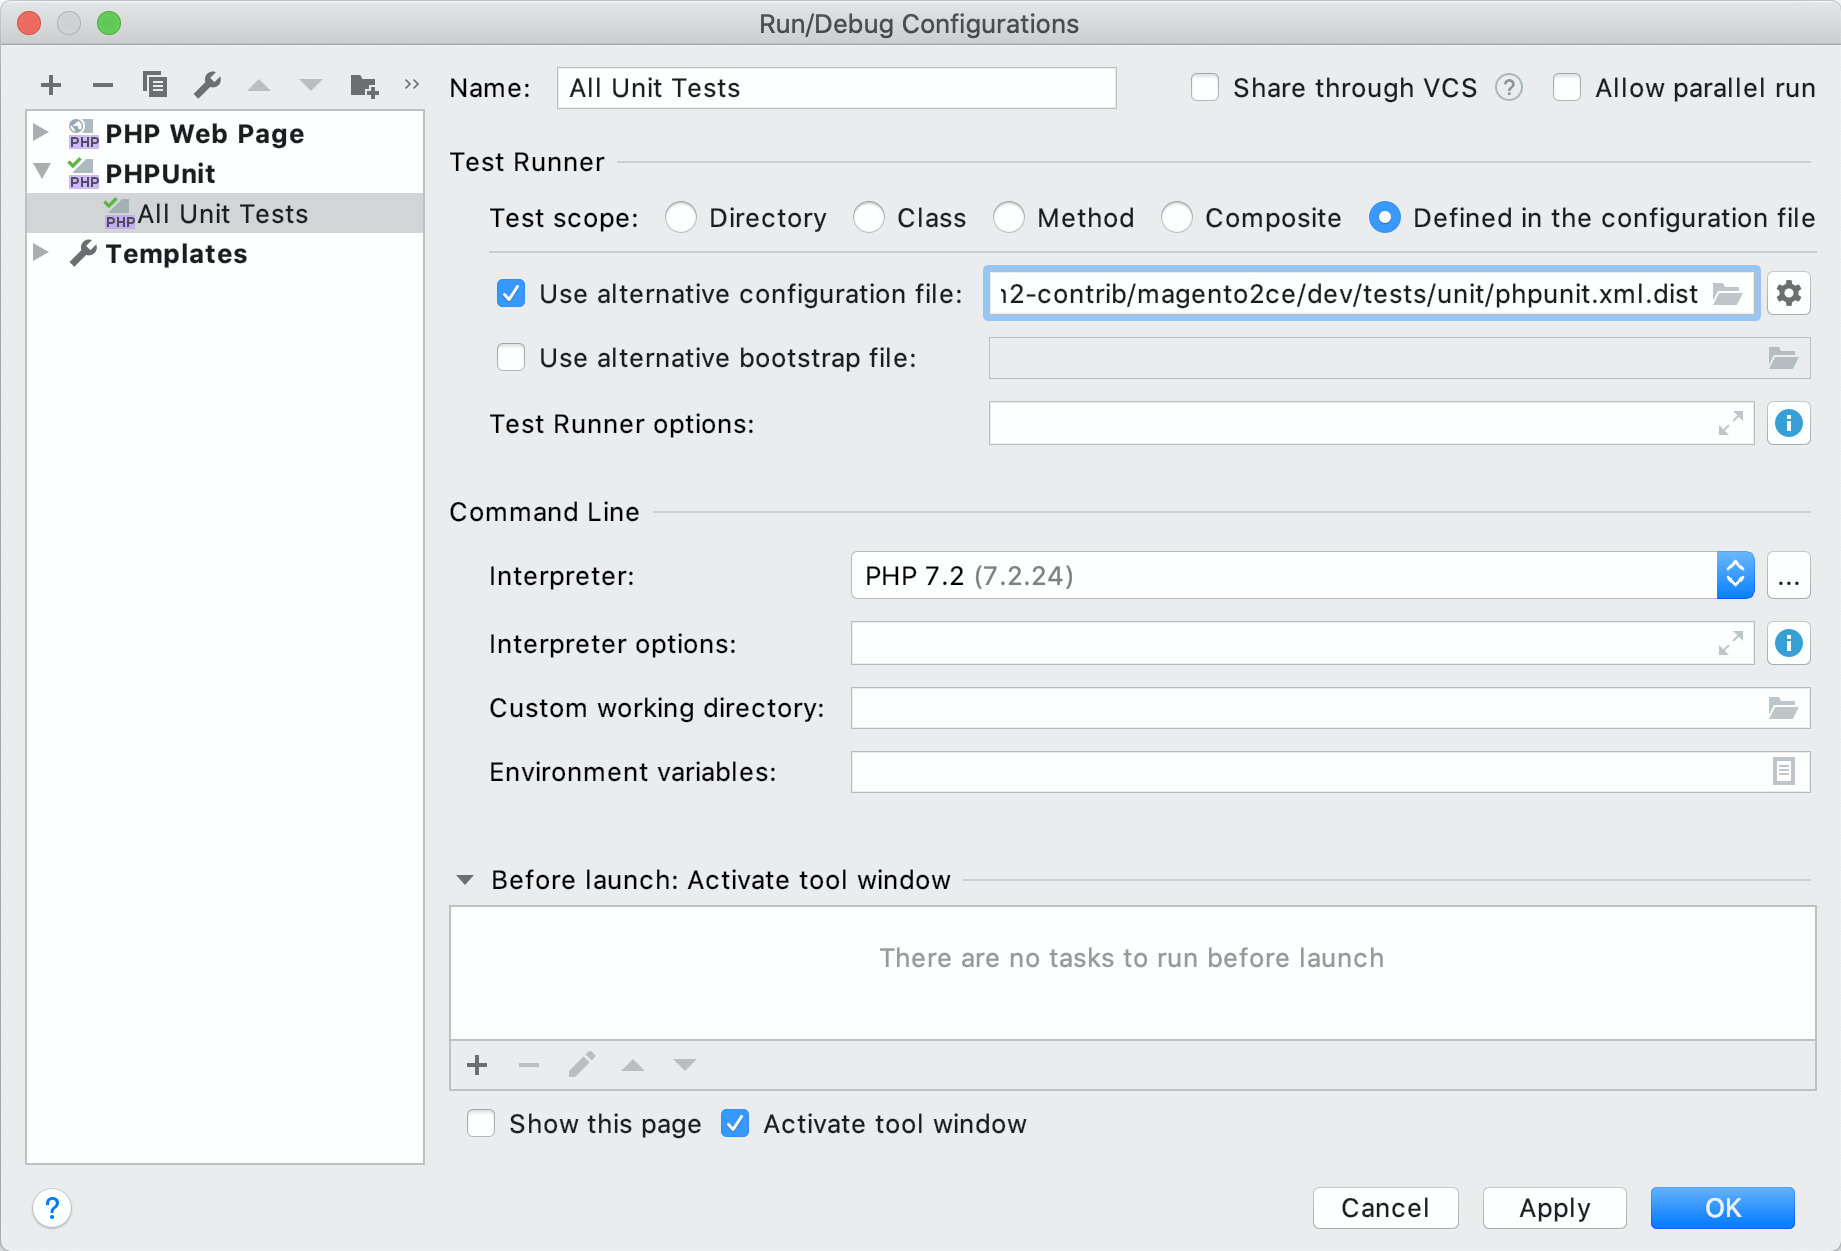
If you want to run all tests, please follow these steps below:
- Add a name for the configuration
- Test Scope: Choose Defined in the configuration file option
- Tick on Use alternative configuration file
- Select dev/tests/unit/phpunit.xml.dist
- Click OK to finish
Running tests of one module
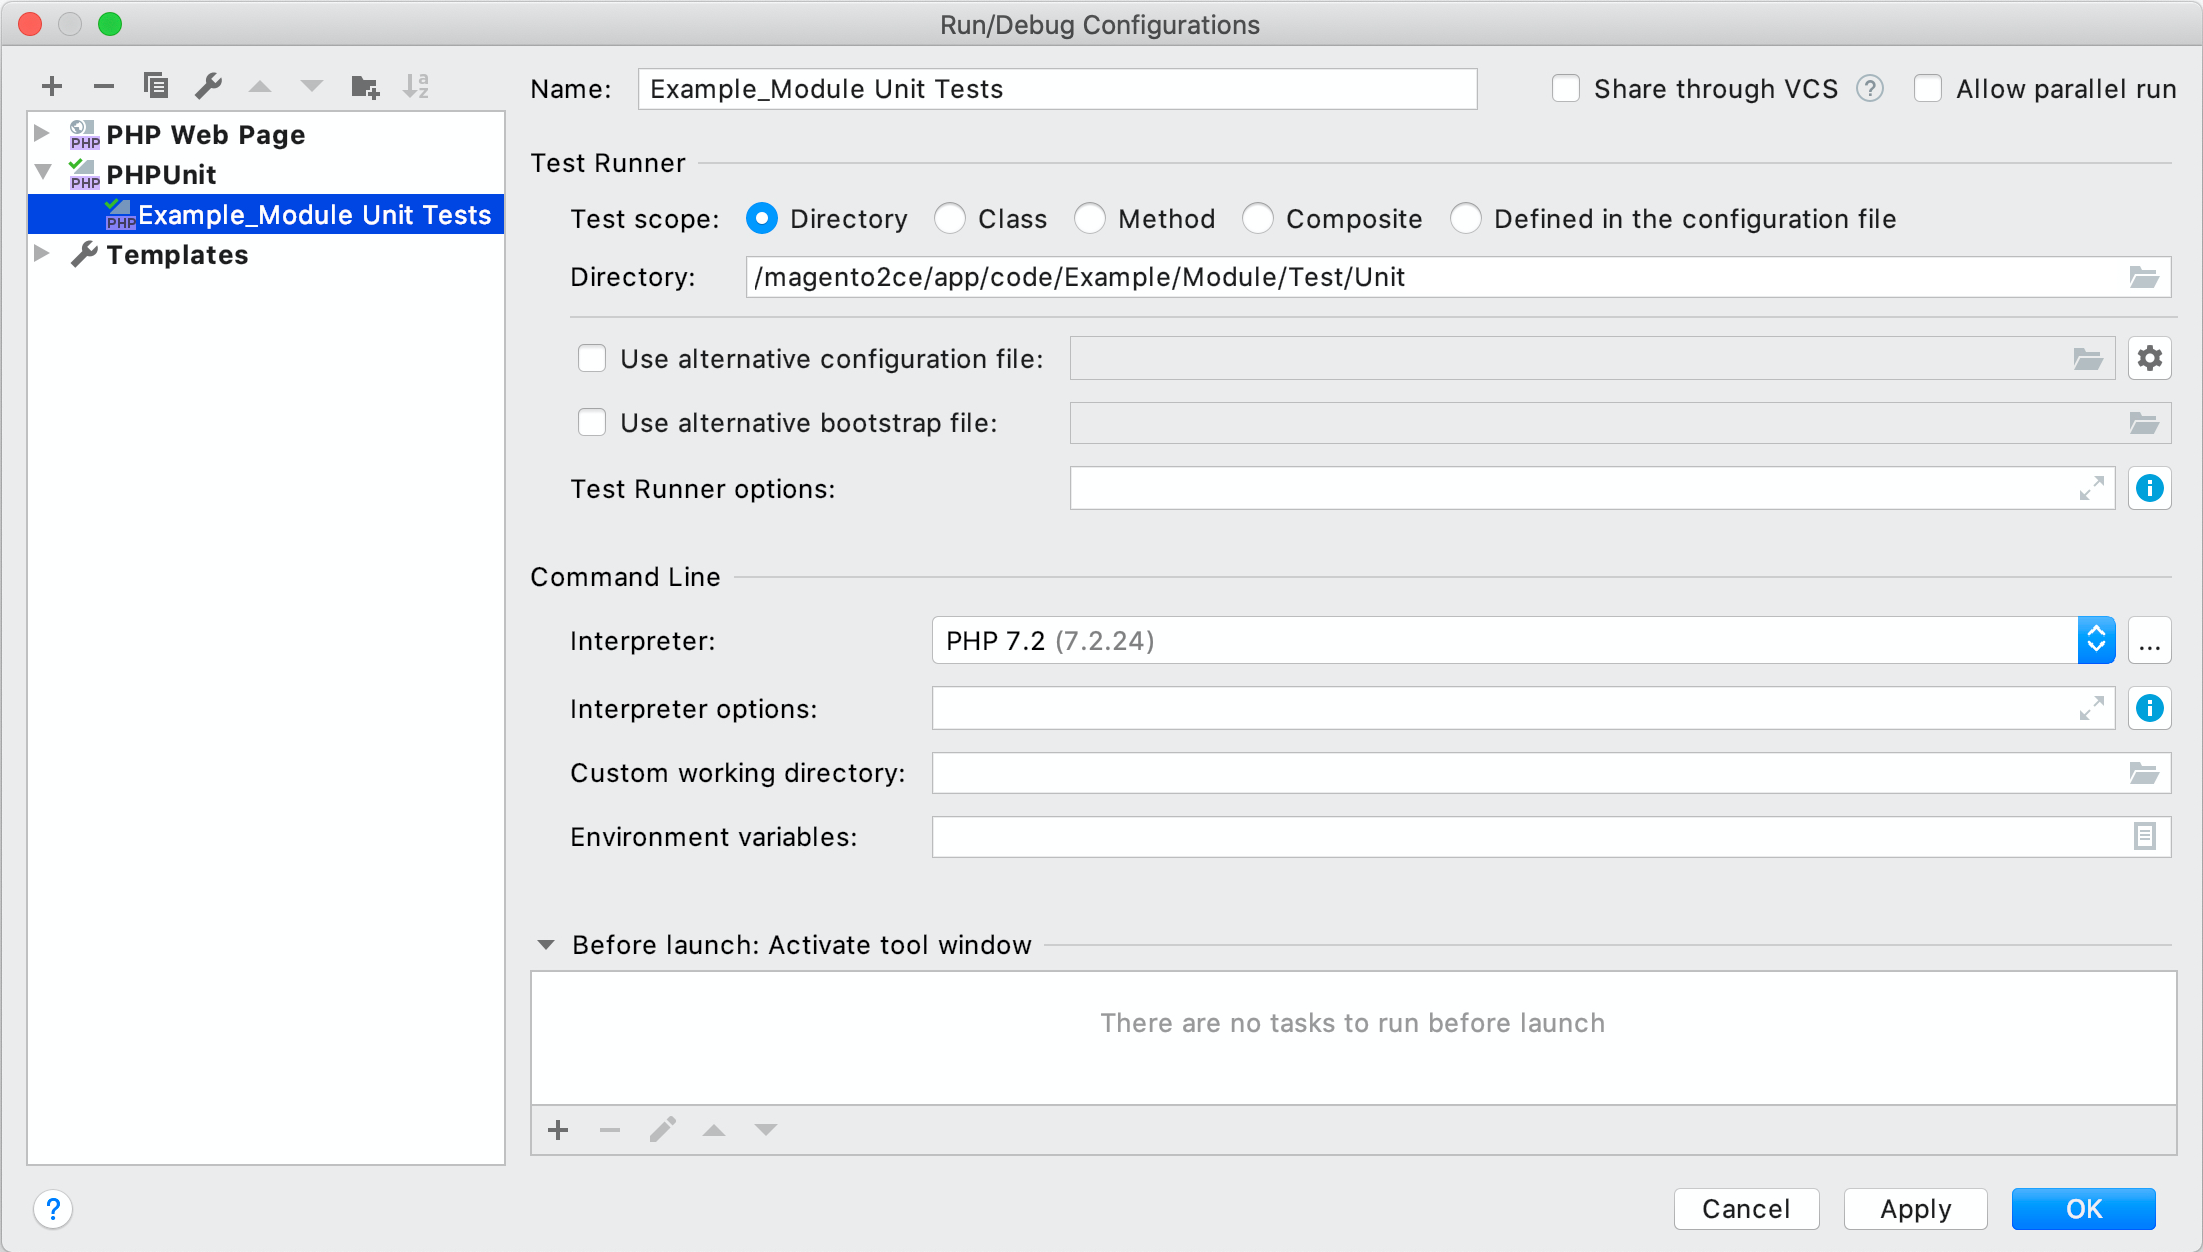
On the other hand, these steps will help to run just one test of a specific module:
- Add a descriptive name for the configuration
- Test Scope: Choose Directory option
- Choose the directory including the modules unit test. For example, in this case, it is /magento2ce/app/code/Example/Module/Test/Unit
- Click OK to finish
Running tests in a class
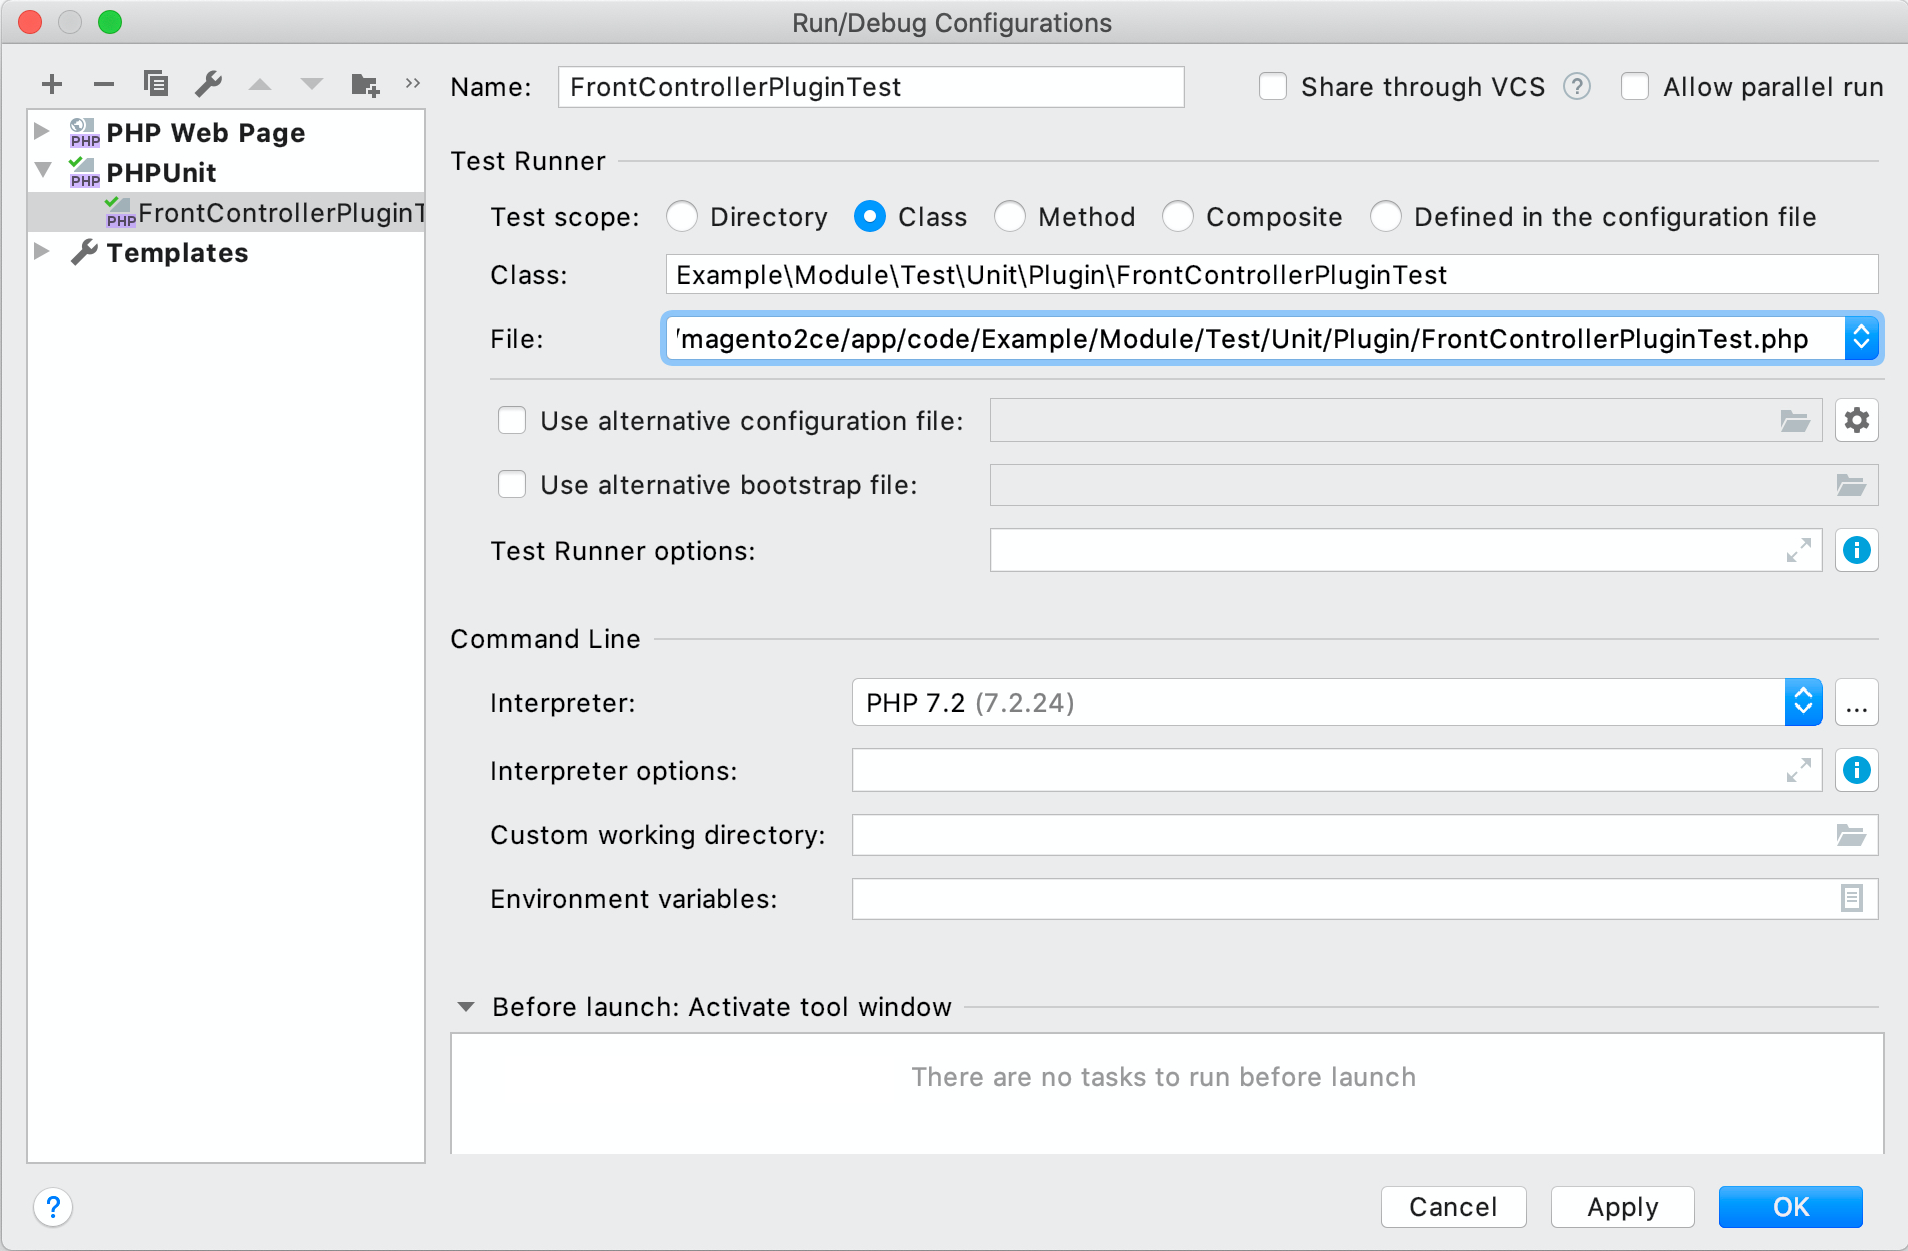
Similar to 2 kinds of tests running above, there are simple steps to conduct this process:
- Add a name for the configuration
- Test Scope: Choose Class option
- In the Class box: Type the qualified class name in full
- In the File box: Choose the file including the test class
- Click OK to finish
Troubleshooting

Whenever referring to code testing, developers always have trouble since it is relatively complicated.
Therefore, we will provide several common problems that programmers usually run into when implementing Magento 2 Unit Testing.
Also, possible solutions for each fault will be identified that can be helpful for you to fix it up.
Permission Denied
Error:
<?permission denied: vendor/bin/phpunit
Reasons:
You won’t have permission to modify. This problem occurs when you try to execute this PHPUnit inside a Virtual Box VM with shared folders that don’t allow you to do so.
Solutions:
You can try to prefix the command with the PHP interpreter as follows:
php -f vendor/bin/phpunit -- -c dev/tests/unit/phpunit.xml.dist
Incorrect PHP Interpreter
Reasons:
This might happen when you use more than one PHP installed and get confused about what is the correct PHP interpreter for testing.
Solutions:
You can either fix your path or specify the full path to the PHP interpreter. Please check the below code as an example:
/usr/local/Cellar/php56/5.6.19/bin/php -f vendor/bin/phpunit -- -c dev/tests/unit/phpunit.xml.dist
Memory Limit
Error:
Fatal error: Allowed memory size of 67108864 bytes exhausted
Solutions:
You can resolve it by simple steps:
- Copy the PHPUnit configuration file dev/tests/unit/phpunit.xml.dist to dev/tests/unit/phpunit.xml
- Find the following section:
<php>
    <ini name="date.timezone" value="America/Los_Angeles"/>
    <ini name="xdebug.max_nesting_level" value="200"/>
</php>
- Add the following in the <php> block:
<?<ini name="memory_limit" value="-1"/>
Conclusion
In conclusion, conducting PHP Unit Tests for Magento 2 is extremely complicated to follow. It includes so many steps. However, we have to say that it’s worth a try as you can identify problems early; hence, it is much easier for you to improve your products.
We hope that this article will give you helpful information about Magento 2 Unit Testing.
If you need further information, please don’t hesitate to comment in the section below or contact us. We are glad to answer anytime.
Thanks a lot for reading!
You may also be interested in:

