
For many Magento store owners, it has become very resource-consuming to test everything manually during the functional testing phase. You have to go through a lot of different flows for each feature. And we inevitably keep adding new features, so the time your QA team will spend on tests will increase.
In this scenario, the Magento 2 functional testing framework is undoubtedly necessary that helps save time and effort in the testing phase.
So this blog post introduces you to Magento 2 MFTF and guides you on setting up a testing framework on your Magento website.
Let’s begin!
What is Magento 2 Functional Testing Framework?

Functional testing framework
Before getting to know about the Magento 2 Functional Testing Framework, we should be aware of the Functional Testing Framework in general.
Functional Testing Framework is an open-source, cross-platform solution in which we can conduct tests related to the functionality of a certain store. These tests can be available at any time with the three following options:
- Running a single test independently
- Running multiple tests simultaneously as a test suite
- Running all possible tests in one-go
Functional tests cover most of the functionality of a business entity. And the goal is to find discrepancies between expected and real behavior of the entity.
Magento 2 functional testing framework
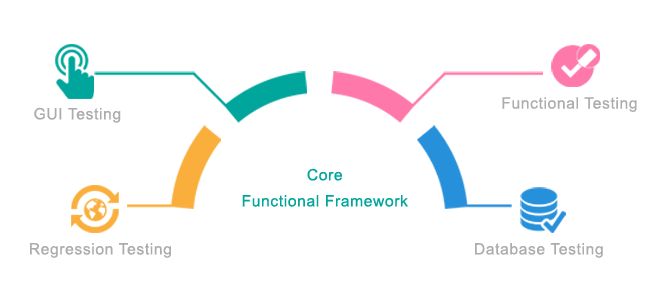
Magento 2 Functional Testing Framework simply is a suite of ready-made tests that check if the whole system functionality runs as expected.
In fact, Magento 2 MFTF aims at replacing the Magento Testing Framework in future releases. The framework was introduced by Tom Erskine at Mage Test Fest. MFTF has already released two major versions, and the latest one available till today is 2.3.12.
In case admins want to expand the default functionality of the website, you need to cover all the new features with autotests, and notably, even manual testers can do it. It is because MFTF only uses XML for writing test cases instead of PHP. PHP phase only comes later when XML test cases are converted automatically into PHP scripts and tested in tools like Codeception, Selenium, or Allure.
Reasons to Apply MFTF to Your Project
People can list some advantages of applying MFTF to automate testing like:
- It helps reduce testing time
- This is a tool that works from scratch and suits to different platform
- The tool can be used in long-term projects development;
- There are multiple product versions support;
- It is possible to test products on different Magento versions and detect version-specific bugs etc.
However, we at Mageguides will give you five major reasons to run a test with Magento 2 MFTF.
For one, it must be based on a well-established Codeception testing framework. MFTF provides users with some guarantees of stability and security for their commitment to MFTF.
The second reason is that it is built by Magento and for Magento. That means we should get the tool optimized for our specific tasks. Also, Magento actively listens to the community, so feel free to reach them out if you miss something in the MFTF.
The third reason is scalability. In other words, when writing tests for MFTF, you can reuse parts of other tests, sections, or even page definitions, which allows you to hide the overall complexity of the project, and this also enables you to split the workload easily among several QA engineers. That is the scalability of the development process.
MFTF also gives you infrastructure scalability as you can quickly execute different groups of tests in different environments and run them in parallel.
The fourth reason is support for XML automatic processing, which I’ve already mentioned. It, for example, can be used to generate the test project from some template automatically.
One last reason is that you can use services such as BrowserStack to test your website operation on thousands of browsers running on real devices.
Types of Functional Testing
Functional Vs. Non-Functional Testing
Functional testing is different from non-functional testing by its purpose, and by a typical test result.
Unlike Functional testing, non-functional testing both measures how an application scales or performs under various scenarios (e.g., performance testing) and simply measures how the app handles realistic or high usage volume (e.g., load testing).
Rather than indicating whether or not a functional requirement of a system or subsystem has passed for QA or compliance purposes, non-functional tests show results with more detailed analyses and comparisons. But while these tests differ, it is normal that test software vendors support every type of software testing as long as a single test automation tool suite is purchased via a single license.
To have a clearer distinction, let’s look at the table below.
| Functional Testing | Non-Functional Testing |
| Functional testing uses the functional specification provided by the client and verifies the system against the functional requirements. | Non-functional testing checks the aspects of the software system like performance, reliability, scalability. |
| Functional testing is executed first. | Non-functional testing should be run only after functional testing. |
| Manual or automation testing tools can be used for functional testing. | Using tools will be useful for non-functional testing. |
| The inputs to functional testing are business requirements. | The inputs to non-functional testing are performance parameters like speed, scalability. |
| Functional testing describes what the product does. | Non-functional testing describes how good the product works. |
| Easy to do Manual Testing. | Difficult to do Manual Testing. |
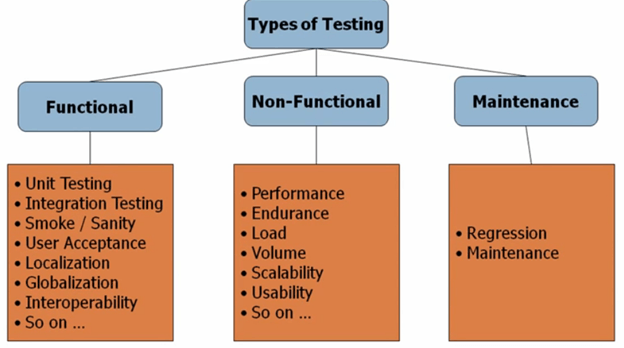
| Examples of Functional testing: – Unit Testing – Smoke Testing – Sanity Testing – Integration Testing – White-box testing – Black-box testing – User Acceptance testing – Regression Testing |
Examples of Non-functional testing: – Performance Testing – Load Testing – Volume Testing – Stress Testing – Security Testing – Installation Testing – Penetration Testing – Compatibility Testing – Migration Testing |
There are various kinds of functional tests provided or supported by functional testing tools:
- Unit testing: Unit tests are often automated for a small unit of code or a single task within the software code.
- Smoke testing (alternately sanity testing): This is a preliminary test to uncover severe failures that might make further detailed or advanced process testing impossible.
- Interface testing: it is the test of a product’s graphical user interface. The process is to ensure it meets specifications, or that navigation works as designed.
- System testing: all components working in concert within an integrated system are tested to ensure they behave in compliance with requirements.
- Regression testing: it is designed to uncover new bugs after patches or configuration changes have been made to a system.
Specific Features of The Test-Cases Designed for Auto-Tests

As you may not notice, test-cases designed for automation testing are an entirely different thing that is definitely worth paying attention to.
While other types of test documentation are way too unspecified, we give you more information about test-cases because they are quite detailed and therefore are essential for automation functional testing.
With the hands-on Test Survey, an automation engineer, no matter how experienced they are, can risk missing important checks. Hence the test will never attain its primary target and detect the defects.
Let’s consider some of the most important points of test-cases.
Recurrent checks and steps
Test-cases must involve as few recurrent checks and steps as possible. Indeed, if there were a bug in a product, several autotests would crash, not just one. For sure, making all steps individual is barely possible.
Preconditions
“Preconditions” are a list of actions that can lead to a suitable status for running the main test.
While testing manually, the quality assurance engineer scarcely thinks of test execution preconditions. However, they are crucial for auto-tests.
For example, we have a test-case on product editing. We would select any existing product and edit it during the manual test. However, an auto-test should not act that way. We may risk breaking the co-dependence of tests. While the other will try to use it the same way, the test of a product can crash if it is edited.
Thus, creating test-cases via an autotest can be an optimal solution. It is important to understand that adding such data is not the test itself, and these are just secondary actions. As preconditions make tests self-sufficient, stable, independent and reduce test runtime, they are significant.
Test-case optimization
It is important to use the shortest path of the test-case. You can minimize the time-consuming steps like transition through pages, tabs or buttons clicks, dialog opening, or closing to accelerate the test.
Plus, one step should not be referenced to another step. For instance, you shouldn’t write “Repeat steps 1-10 for a configurable product” in step 11 because this check is unnecessary at all. We can include it in a separate test for this type of product instead.
The connection between auto-test and a test-case
Another critical point is the correspondence of an auto-test with a test-case. Each step of the auto-test should be the same as in the test-case. This is the only way to check the results of auto-tests, find bugs, and maintain tests.
Size optimization
The pretty complicated task is how to optimize a test-case size.
Actually, there is no definite answer to what size should a test-case for automation be.
We stick to the following approach:
- You can run one test only, which means it is a significant check. For instance, check whether the cart price rule can be edited.
- You can add a few minor checks after a significant one, providing they use the same preconditions and do not take too much time on the test runtime.
- In case there is an indivisible sequence of steps, they are taken out to the action group.
Step-By-Step Guide to Setup Magento 2 Functional Testing Framework
So all the theories above will be helpful for you to work with MFTF or just start testing with it. Now, we want to share some necessary steps to set up a completed framework from our experience.
They will help you start a fast and efficient setup without stumbling. So let’s begin!
Step 1 – Fresh Install Magento 2
I hope you have already installed Magento 2. But still, if you are new to the platform, please refer to our guide for Magento 2 installation.
You can also download Magento 2 extensions from HERE to extend your store’s functionality, then just extract it to your setup.
Step 2 – Install dependencies
In the next step, you have to install the MFTF.
Please follow the command below:
composer install -d dev/tests/acceptance/
Step 3 – Build the project
In the Magento 2 project root, run:
vendor/bin/mftf build:project

Step 4 – Edit environmental settings
In the [Magento_Root]/dev/tests/acceptance/ directory, edit the .env file to match your system.
vim dev/tests/acceptance/.env
Indicate the following parameters, which are required for tests:
- MAGENTO_BASE_URL: it must contain a domain name of the Magento instance that will be tested. (e.g., http://127.0.0.1/magento2mftf/)
- MAGENTO_BACKEND_NAME: it must contain the relative path for the Admin area. (e.g., admin)
- MAGENTO_ADMIN_USERNAME: it must contain the username required for authorization in the Admin area. (e.g., admin)
- MAGENTO_ADMIN_PASSWORD: it must contain the user password required for authorization in the Admin area. (e.g., admin123456)
Step 5 – Enable the Magento CLI commands
In the [Magento_Root]/dev/tests/acceptance directory, run the command below to enable the functional testing framework to send Magento CLI commands to your Magento case.
cp dev/tests/acceptance/.htaccess.sample dev/tests/acceptance/.htaccess
Step 6 – Generate and run tests
To start the tests, you need a running Selenium server and functional testing commands.
Run the Selenium server in another terminal.
Run the Selenium server in the terminal. Remember that both selenium the jar file and browser the driver should be in the same place.
In our case, both located in the root directory.
For example, the following commands run the Selenium server for Google Chrome:
cd <path_to_directory_with_selenium_server_and_webdriver>/Java -Dwebdriver.chrome.driver=chromedriver -jar selenium-server-standalone-3.14.0.jar
Generate the tests
In the Magento root directory, run the below command –
vendor/bin/mftf generate:tests

Conclusion
Magento 2 MFTF creates a favorable condition for us to test user interactions with all the functionality on web applications. Moreover, it helps developers and testers in automating regression testing.
We hope the whole article could provide you with a new idea about the Magento 2 functional testing framework and how to set up your own testing framework with ease. If you have some feedback or need help with it – feel free to drop a comment for us!
If you are searching for Magento 2 themes that are carefully tested and verified, don’t forget to check out our latest Magento 2 theme collection!!!