
If you are a developer then you definitely should read this Magento frontend developer guide! Let’s take a look at this post to unveil the key to your business success.
The reason is that it will provide you with useful skills and knowledge to become a professional developer in creating a perfect front website.
The more accessible customers find product information on your frontend site, the quicker they make a purchase. As a result, you can boost sales and revenues significantly.
Keep reading to figure out.
The Importance of Frontend Development for Business Success

Frontend development can create intuitive and business concentric user experiences for a website or web application. Your business success can be defined by improving web performance.
So, in this part, we will highlight the necessity of frontend development via its significant benefits.
- Drive performance
Customers always get irritated when they visit slow web pages and applications and they will leave those pages immediately.
As a result, speedy and fast pages can improve customer engagement, and boost sales as well as conversation rates.
Thus, improved performance is one of the most considerable business advantages of frontend development.
- Optimize navigation
Excellent navigation includes a well-structured and clean site layout, which can help customers find what they are looking for without difficulty.
Furthermore, it also gives customers a quick walk around, and this builds their trust and loyalty.

- Build brand
With suitable and familiar content and media, you can target the right customers and make them remember your brand naturally.
Moreover, if you use critical design considerations, such as the use of the logo, unique layout, etc, you can receive positive feedback from customers.
- Interface design
Your website is one of the most important marketing tools as if customers visit your site and feel impressed and useful, they will introduce it to many other people.
The usability of your website should contain seamless communication for user functionality.
- Visitor retention
Well-designed interfaces and responsive design can build trust and confidence in your brand.
Apart from that, they also help achieve your communication goals leading to higher traffic and conversion rate.
Easy Magento Frontend Developer Guide for Beginners

Magento developers can use this Magento front end tutorial to make a custom theme to drive Magento storefront to a particular customer.
Preparation

To carry out perfectly what is discussed in this Magento frontend development guide, you need a working Magento installation and the below browser versions installed on your device:
- Chrome latest, latest–1 (any operating system).
- Internet Explorer 11 or later version, Microsoft Edge, latest–1.
- Safari Mobile for iPad Mini,iPad 2, iPad with Retina Display (iOS 12 or later), for desktop frontend.
- Chrome for the mobile latest–1 (Android 4 or later version) for the mobile storefront.
Moreover, you also have basic knowledge about CSS, CSS3, HTML, and HTML 5, LESS, XML, Javascript, PHP, Responsive Web Design.
Magento frontend tutorial
The following Magento 2 frontend guide is for different levels with various development skills, and you can use them to customize your website.
- Using cascading style sheets (CSS) can make simple changes to your site, such as color change, the feel and look of various interface components, replacing images, and other relatively cosmetic changes.
If you want to make more advanced styling, LESS and XML may be helpful.
In this Magento front end tutorial; you can change your site structure, you need to accept the default structure of your site when you load the module.
- Existing modules can generate the HTML, which makes changes CSS and images on your site.
If you want to do this, rudimentary PHP skills are required to adjust PHTML template files.
PHP coding is involved in the process, you can copy and paste small sections of PHP code from old template files into a new one with differently structured HTML.
This can be useful if the existing HTML generated does not have sufficient CSS class names or HTML elements to gain the presentation adjustment you prefer to achieve.
- The next level of Magento 2 frontend guide is moving functionality between places on a page or to entirely different pages, you can change your structure quickly and simply.
You can use the Magento layout engine to achieve it, and there is no PHP coding required.
- Thanks to existing Magento or third-party, you can develop new modules to add new custom functionality to your site or to extend it.
This is the end of the Magento front end tutorial for beginners; however, the third level of customization is not solved in this guide.
If you think this guide is easy and want to more complicated instructions, keeping reading as we will provide you in the following part.
Professional Magento Frontend Developer Guide to Create A New Storefront Theme
Prerequisites

- Using this Magento frontend tutorial to create a new storefront theme, you can customize your Magento store design.
Keep in mind that you mustn’t modify the out of the box Magento themes for the sake of compatibility, upgradability, and easy maintenance.
- The developer module should have your Magento application. The application mode influences the way Magento caches static files.
The Magento frontend developer guides we recommend below are developer/default-mode specific.
Let’s go!
Create a new storefront theme

Create a new frontend them: Walkthrough
- You can create a directory for the theme under app/design/frontend/<your_vendor_name>/<your_theme_name>.
- Add a declaration file theme.xml while you create an etc directory and create a file named view.xml to the theme directory.
- Add a composer.json file.
- Add registration.php.
- Create directories for CSS, JavaScript, fronts, and images.
- You can configure your theme in your admin panel.
Create a theme directory
- Go to <magento_root>/app/design/frontend.
- According to your vendor name, you can create a new directory: /app/design/frontend/<Vendor>.
- Create a directory theme depending on your theme under the <vendor> directory.
app/design/frontend/
├── <Vendor>/
│ │ ├──…<theme>/
│ │ │ ├── …
│ │ │ ├── …
Declare the themes
After you generate a directory for your theme, the next step of the Magento frontend developer guide is to generate theme.xml, including the theme name.
Furthermore, you can indicate the parent theme name and, if needed, where the theme preview image is stored.
- Add or duplicate from an existing theme.xml file to your theme directory app/design/frontend/<Vendor>/<theme>.
- Configure it using the below instance
<?<theme xmlns:xsi="http://www.w3.org/2001/XMLSchema-instance" xsi:noNamespaceSchemaLocation="urn:magento:framework:Config/etc/theme.xsd">

   <title>New theme</title> <!-- your theme's name -->

   <parent>Magento/blank</parent> <!-- the parent theme, in case your theme inherits from an existing theme -->

   <media>

      <preview_image>media/preview.jpg</preview_image> <!-- the path to your theme's preview image -->

   </media>

</theme>
Remove the <media> node if you don’t see any preview images for your theme:
<?<theme xmlns:xsi="http://www.w3.org/2001/XMLSchema-instance" xsi:noNamespaceSchemaLocation="urn:magento:framework:Config/etc/theme.xsd">

      <title>New theme</title> <!-- your theme's name -->

      <parent>Magento/blank</parent> <!-- the parent theme, in case your theme inherits from an existing theme -->

</theme>
Before you change the theme title or parent theme information in theme.xml, a theme was already registered, you should open or reload any Magento admin page to ensure that your changes be saved in the database.
Make a Composer Package
Add a composer.json file to your theme directory and then register the package on a packaging server ì you want to distribute them as a package.
The composer.json file provides theme dependent information related to a current theme.xml file for the correct dependencies and their versions.
For instance, a theme composer.json file:
<?{

    "name": "magento/theme-frontend-luma",

    "description": "N/A",

    "config": {

        "sort-packages": true

    },

    "require": {

        "php": "~7.1.3||~7.2.0",

        "magento/framework": "*",

        "magento/theme-frontend-blank": "*"

    },

    "type": "magento2-theme",

    "license": [

        "OSL-3.0",

        "AFL-3.0"

    ],

    "autoload": {

        "files": [

            "registration.php"

        ]

    }

}
Add registration.php
You can register your theme in the system by adding a registration.php file in your theme directory with content as a following:
<?<?php

/**

 * Copyright © Magento, Inc. All rights reserved.

 * See COPYING.txt for license details.

 */

use \Magento\Framework\Component\ComponentRegistrar;

ComponentRegistrar::register(ComponentRegistrar::THEME, 'frontend/<Vendor>/<theme>', __DIR__);
Configure images
With Magento frontend developer guide, you can configure product image sizes and other prosperities in a view.xml configuration file.
Add view.xml file via following simple steps:
- Log in to your Magento server with the role of user with permissions to generate directories and files in the Magento installation directory.
- Make the etc directory in the theme folder.
- Copy the view.xml file from the etc directory of the parent theme or copy it from the Blank theme.
- Configure all storefront product image sizes in the view.xml file. For example:
<?...

  <image id="category_page_grid" type="small_image">

      <width>250</width>

      <height>250</height>

  </image>

 …
Create the directories for static files
Your theme may contain these files like fronts, Javascript, styles, images.
Each type should be stored in a different subdirectory of the web in your theme folder:
app/design/<area>/<Vendor>/<theme>/
├── web/
│ ├── css/
│ │ ├── source/
│ ├── fonts/
│ ├── images/
│ ├── js/
To clear the pub/ static directory:
<?rm -rf <magento_root>/pub/static/*To clear the var/ view-preprocessed directory:
<?rm -rf <magento_root>/var/view_preprocessed/*Declaring theme logo
You can declare a theme logo by adding an extending <theme_dir>/Magento_Theme/layout/default.xml layout.
For instance:
<?page xmlns:xsi="http://www.w3.org/2001/XMLSchema-instance" xsi:noNamespaceSchemaLocation="urn:magento:framework:View/Layout/etc/page_configuration.xsd">

    <body>

        <referenceBlock name="logo">

            <arguments>

                <argument name="logo_src" xsi:type="string">images/my_logo.png</argument>

                <argument name="logo_width" xsi:type="number">300</argument>

                <argument name="logo_height" xsi:type="number">300</argument>

                <argument name="logo_alt" xsi:type="string">Logo name</argument>

            </arguments>

        </referenceBlock>

    </body>

</page>
Frontend Troubleshooting And Solution
The frontend problem and solution below are based on Algolia’s instructions. Thanks for their sharing.
Frontend issues
- Unexpected results
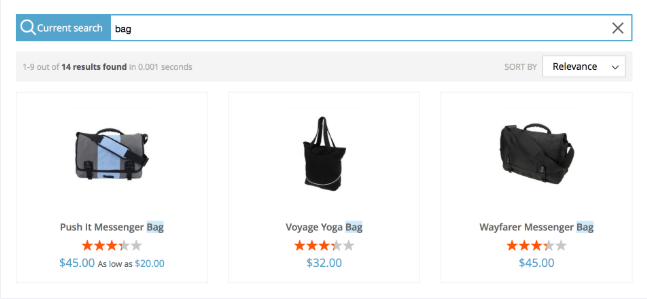
It is possible to see unexpected results when you search for products. The best way to figure out where it’s coming from is that you should compare them to the results you get with the same search in your dashboard:
Go to Indices then do search for your default product index via default magento_default_products.
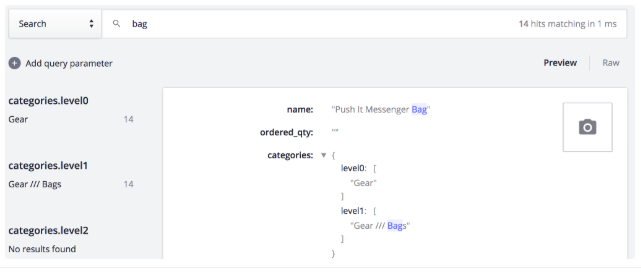
If you see the same result on the dashboard and on the frontend and you don’t want it, this probably means that there’s an issue on how you configured your index.
- No images
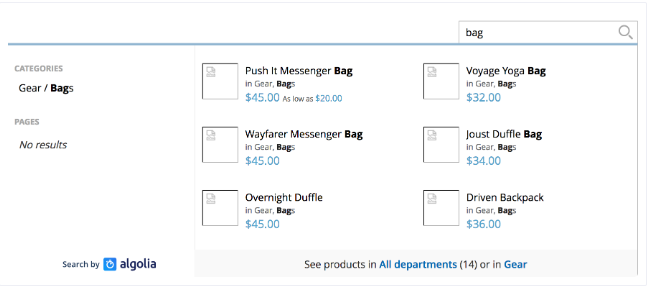
The search results may give you information without images as the resized images can be used in the Magento’s cache, and they only exist in the pub/media/catalog/product/cache directory.
Furthermore, each time you clean the image cache of Magento, this directory is emptied. If you do so, the indexed images will no longer exist.
Solution
- Checking the source code
To display the source code, please press Ctrl+U ( or Command +U for Mac).
You may:
- If you didn’t turn on the JavaScript appearing in the Magento configuration, you could check if the 3 JavaScript embedded by the extension is loaded in the <head> div (common.js, instantsearch.js, and autocomplete.js). These three files are mandatory for the search to work.
- Check your code in case the native search input on the header has been replaced by the search input.
- In the products listing pages, search for the DOM selector defined in the back-office in Stores => Search => Instant Search Results Page > DOM selector (by default, it’s .columns). This selector needs to be on the page for the results to be injected in the page.
- Using the console
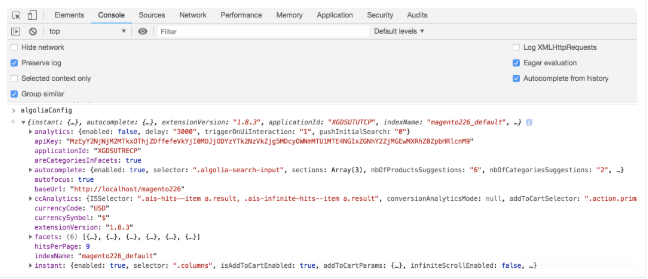
In the console tab, you can type “Config” then press Enter button, and then you can see all the configuration included in the object (coming from your Magento configuration).
It is useful to help you test whether your front end is up to date with the latest modifications or not. Besides, it reminds you to clear the cache.
- Investigate the autocomplete HTML code
You can activate the debug mode in Stores => Search => Autocomplete Menu => Enable autocomplete menu’s debug mode to investigate autocomplete HTML code menu with the developer tools.
If you do so when you click outside the menu, the dropdown won’t disappear anymore, and this is very useful for a closer look at the HTML generated by the extension.

Wrapping Up

With the Magento frontend developer guide mentioned above, we hope you have a better understanding and skills to create a frontend.
If you have any questions, feel free to let us know.
You will receive dedicated support.