Magento 2 extension tutorial is a prestigious document if you are a developer or a merchant having a command of a PHP program, and you want to improve your online store via Magento extension.
But you don’t know how to carry out this?
Look no further! This article will help you have a more unobstructed view of Magento.
Get started!
Why Is Magento 2 Extension Needed?

As an online merchant, you need to do everything to save costs for your online store. Or your Magento default is working ineffectively, and you want to update it to be more productive.
At that time, a Magento 2 extension will help.
As a Magento extension tutorial developer, we can see multiple benefits of Magento extensions as we mention below:

- Inventory management:
By using Magento create extension tutorial to create Magento extension, you can have useful assistance to manage your products, support your multi-store, and boost sales as well as orders.
- On-time delivery and tracking
With the Magento extension tutorial, you can take advantage of Delivery Date Scheduling to help customers to choose what time they want to receive the items.
As an administrator, you can create your time and date format.
- Saving cost
This is one of the most significant benefits you can gain as it helps your platform be more mobile-friendly and comfortable.
As a result, you don’t have to worry about building a site or access more customers.

- Greater Performance And Scalability
Although there are many available Magento extension tutorial developer packages and install codes that can help you to design and develop or purchase and install extensions from the Magento Marketplace or third-party providers, knowing you should learn how to create Magento 2 extensions is more economical.
With a few Magento 2 extension tutorial steps, you can add the extension on your shop and customize your store quickly, whatever you want.
Then, you will have a better performance to increase your query speed, and enormous merchant data used for indexing includes stores, users, prices, catalog data, and so on.
Apart from that, by using an HTTP accelerator, you also have the chance to get cache requests.
Useful Magento 2 Extension Tutorial for Beginners

After reading all advantages brought for your Magento store as we have mentioned, you must be interested in creating a Magento extension for your online store.
If you have just known about these extensions, don’t miss this section since we will give you a simple and easy Magento create extension tutorial to create a Magento extension.
Preparation

| Computer Hardware | Software |
|---|---|
| - CPU: Many sources can be used from CPU recommended Intel 8th Gen Core i3 to make debugging code. - Hard drive: To increase durability and code speed, you should use 120Gb SSD. - Ram: 12 - 16 GB is essential. In case you don’t have, you can use 8 Gb. - Display: Full HD (1920×1080 pixels) is recommended. | - Text editor: Manage the code source is easier with PHPStorm IDE - Composer: It can be built with PHP code to make Magento 2 component more familiar. - Git: To manage code, up-dated changes, fix bugs, and constant updates. - Xampp: a software to host PHP easily for beginners. - Magento 2 platform: Using the latest version to have enormous benefits. |
Creating a Magento extension with 5 steps
In this part, we will give you 5 simple steps of the Magento 2 extension tutorial to create a Magento extension without difficulty.
To make you have a better understanding of instructions, we will give an example of Magento 2 module development, to be detailed, Magento 2 hello world module.
Step 1: Create Magento 2 Hello World Module Folder
In the root folder of Magento 2, create the code folder: /app/code/[Provider Name]/[Module Name] to store all the resource code.
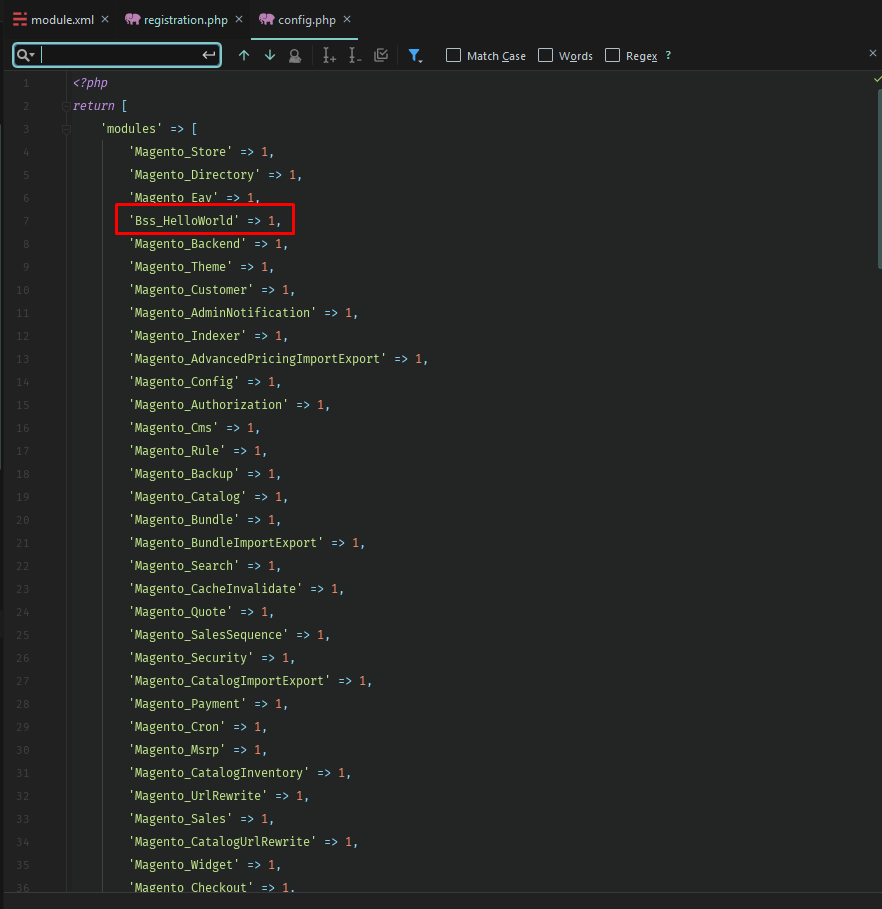
For instance: app/code/Bss/HelloWorld.
Step 2: Use module XML to declare the module
At the following app/code/Bss/HelloWorld/etc/module.xml, in the module.xml file, add the code like the following:
<?<?xml version="1.0"?>

<configxmlns:xsi="http://www.w3.org/2001/XMLSchema-instance" xsi:noNamespaceSchemaLocation="urn:magento:framework:Module/etc/module.xsd">

    <module name="Bss_HelloWorld" setup_version="1.0.0">

    </module>

</config>
In app/code/Bss/HelloWorld/registration.php, you can create the file by adding the code: “Remember to register the created Magento 2 hello world module”.
Then, when Magento is scanning, it will be automatically able to recognize the registered module.
<?<?php

\Magento\Framework\Component\ComponentRegistrar::register(

    \Magento\Framework\Component\ComponentRegistrar::MODULE,

    'Bss_HelloWorld',

    __DIR__

);
In the next following, you can open the Terminal window or Window PowerShell and type the command: php bin/magento setup: update to test the result in the Magento root folder.
Step 3: Create a Magento module controller
In the app/code/Bss/HelloWorld/etc/frontend/routes.xml, define the router using the following code.
<?<?xml version="1.0"?>

<config xmlns:xsi="http://www.w3.org/2001/XMLSchema-instance"

        xsi:noNamespaceSchemaLocation="urn:magento:framework:App/etc/routes.xsd">

    <router id="standard">

        <route id="helloworld" frontName="helloworld">

            <module name="Bss_HelloWorld" />

        </route>

    </router>

</config>
Next, in the app/code/Bss/HelloWorld/Controller/Index/Index.php, you can create the Index.php controller file with the code as follow:
<?<?php

namespace Bss\HelloWorld\Controller\Index;

use Magento\Framework\App\Action\Context;

class Index extends \Magento\Framework\App\Action\Action

{

    /**

     * @var \Magento\Framework\View\Result\PageFactory

     */

    protected $_resultPageFactory;

    /**

     * Index constructor.

     * @param Context $context

     * @param \Magento\Framework\View\Result\PageFactory $resultPageFactory

     */

    public function __construct(Context $context, \Magento\Framework\View\Result\PageFactory $resultPageFactory)

    {

        $this->_resultPageFactory = $resultPageFactory;

        parent::__construct($context);

    }

    /**

     * @return \Magento\Framework\App\ResponseInterface|\Magento\Framework\Controller\ResultInterface

     * |\Magento\Framework\View\Result\Page

     */

    public function execute()

    {

        $resultPage = $this->_resultPageFactory->create();

        return $resultPage;

    }

}
Step 4: Create a Magento 2 module block
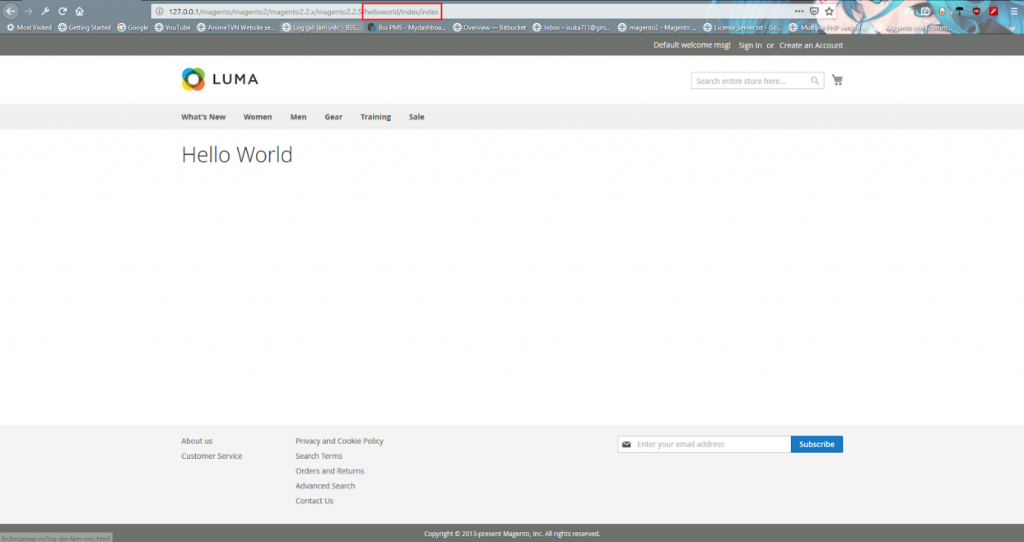
As our example, the completed controller link will like this: helloworld/index/index
Magento 2 use the MVC model (Model – View – Controller), in which block is used to store data. There are two basic steps to create a Magento module block during Magento 2 extensions development
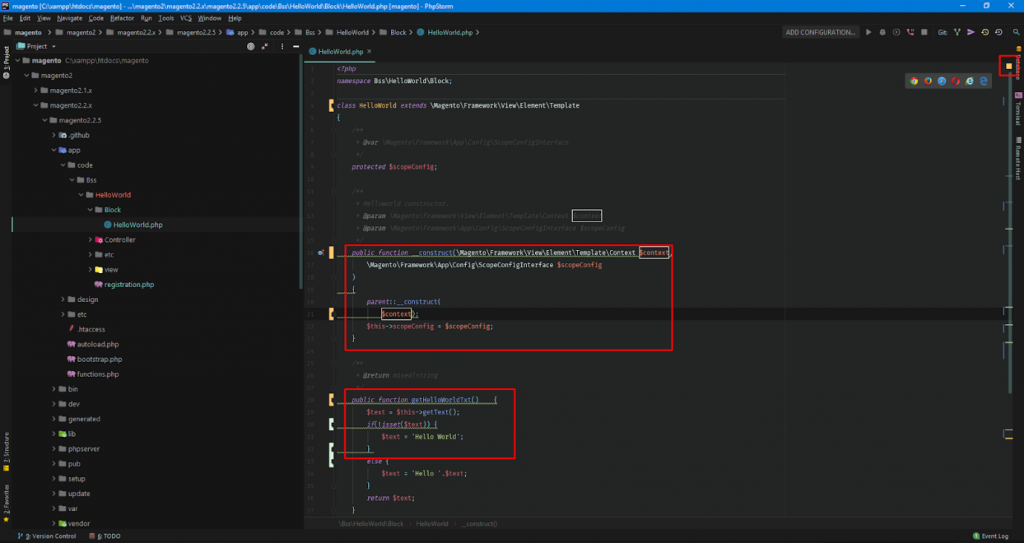
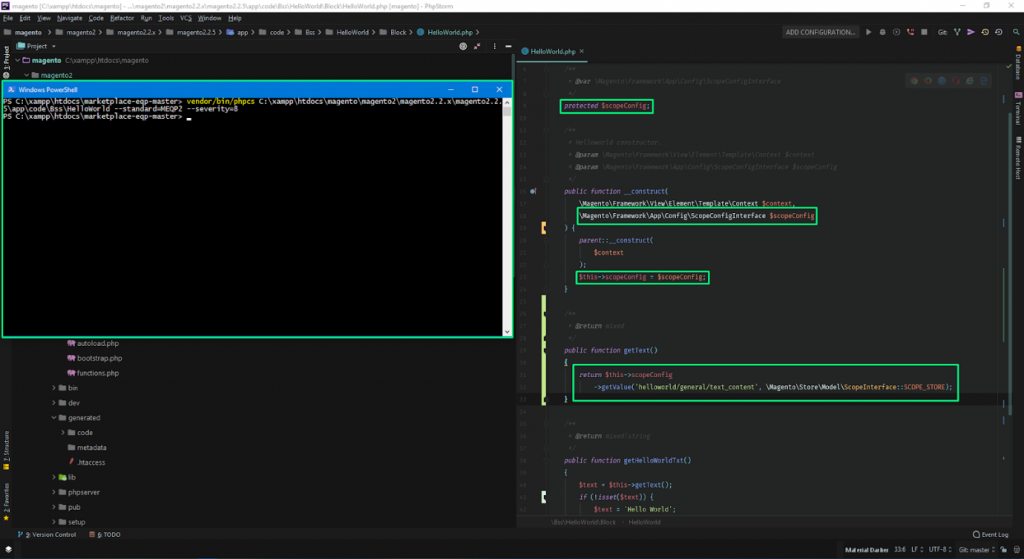
Firstly, generate a file in the app/code/Bss/HelloWorld/Block/HelloWorld.php and insert the code.
<?<?php

namespace Bss\HelloWorld\Block;

class HelloWorld extends \Magento\Framework\View\Element\Template

{

    /**

     * @var \Magento\Framework\App\Config\ScopeConfigInterface

     */

    protected $scopeConfig;

    /**

     * Helloworld constructor.

     * @param \Magento\Framework\View\Element\Template\Context $context

     * @param \Magento\Framework\App\Config\ScopeConfigInterface $scopeConfig

     */

    public function __construct(

        \Magento\Framework\View\Element\Template\Context $context,

        \Magento\Framework\App\Config\ScopeConfigInterface $scopeConfig

    ) {

        parent::__construct(

            $context

        );

        $this->scopeConfig = $scopeConfig;

    }


    /**

     * @return mixed|string

     */

    public function getHelloWorldTxt()

    {

        $text = $this->getText();

        if (!isset($text)) {

            $text = 'Hello World';

        } else {

            $text = 'Hello '.$text;

        }

        return $text;

    }

    /**

     * @return mixed

     */

    public function getText()

    {

        return $this->scopeConfig

            ->getValue('helloworld/general/text_content',    \Magento\Store\Model\ScopeInterface::SCOPE_STORE);

    }

}
Secondly, you can create the data enviroment by creating a file in the app/code/Bss/HelloWorld/etc/adminhtml/system.xml
<?<?xml version=“1.0”?>

<config xmlns:xsi="http://www.w3.org/2001/XMLSchema-instance" xsi:noNamespaceSchemaLocation="urn:magento:module:Magento_Config:etc/system_file.xsd">

    <system>

        <tab id="bss" translate="label" sortOrder="300">

            <label><![CDATA[Bss Commerce]]></label>

        </tab>

        <section id="helloworld" translate="label" sortOrder="130" showInDefault="1" showInWebsite="1" showInStore="1">

            <class>separator-top</class>

            <label>Bss Hello World Setting</label>

            <tab>bss</tab>

            <resource>Bss_HelloWorld::helloworld_config</resource>

            <group id="general" translate="label" type="text" sortOrder="10" showInDefault="1" showInWebsite="1" showInStore="1">

                <field id="text_content" translate="label comment" type="text" showInDefault="1" showInWebsite="1" showInStore="1" >

                    <label>Content goes here</label>

                </field>

            </group>

        </section>

    </system>

</config>
Step 5: Create layouts and templates
In the app/code/Bss/HelloWorld/view/frontend/layout/helloworld_index_index.xml, create the layout file as follow:
<?<?xml version="1.0"?>

<?xml version="1.0"?>

<page xmlns:xsi="http://www.w3.org/2001/XMLSchema-instance"

      xsi:noNamespaceSchemaLocation="urn:magento:framework:View/Layout/etc/page_configuration.xsd"

      layout="1column">

    <body>

        <referenceContainer name="content">

            <block class="Bss\HelloWorld\Block\HelloWorld" name="helloworld" template="helloworld.phtml" />

        </referenceContainer>

    </body>

</page>
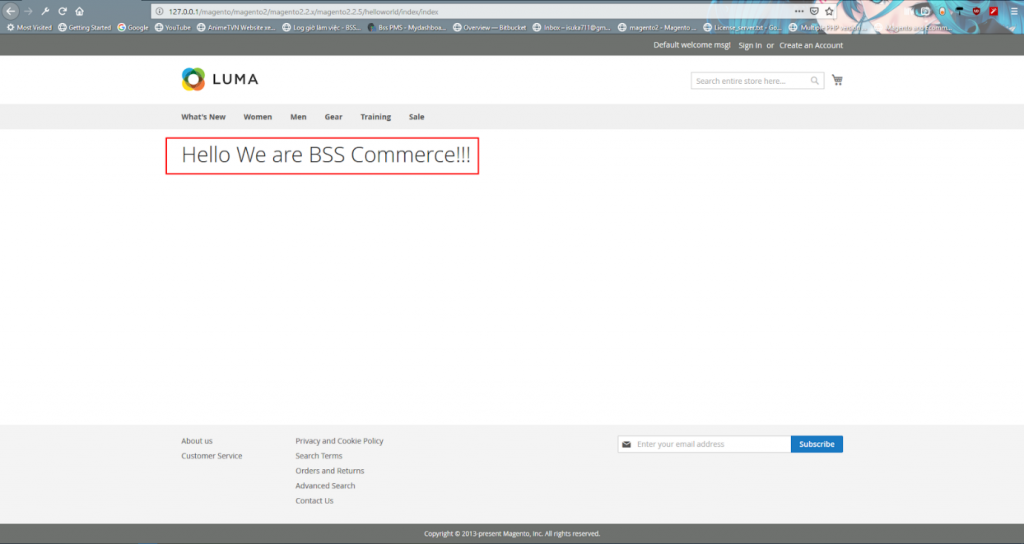
Accordingly, create file in the app/code/Bss/HelloWorld/view/frontend/templates/helloworld.phtml with the code below.Here you see the created block is declared with a set template.
This template is generated to display data of the next block.
<?<?php

/**

 * Product list template

 *

 * @var $block \Bss\HelloWorld\Block\Helloworld

 */

?>

<h1><?php echo $block->getHelloWorldTxt(); ?></h1>
This variable is referencing our block class, so-called the method getHelloWorldTxt().
In the frontend, you should get the result like this:
In the admin of this example, we will go to Store ⇒ Configuration ⇒ BSS Commerce ⇒ BSS Hello Word Setting. Here, there is a data field declared in the system.xml.
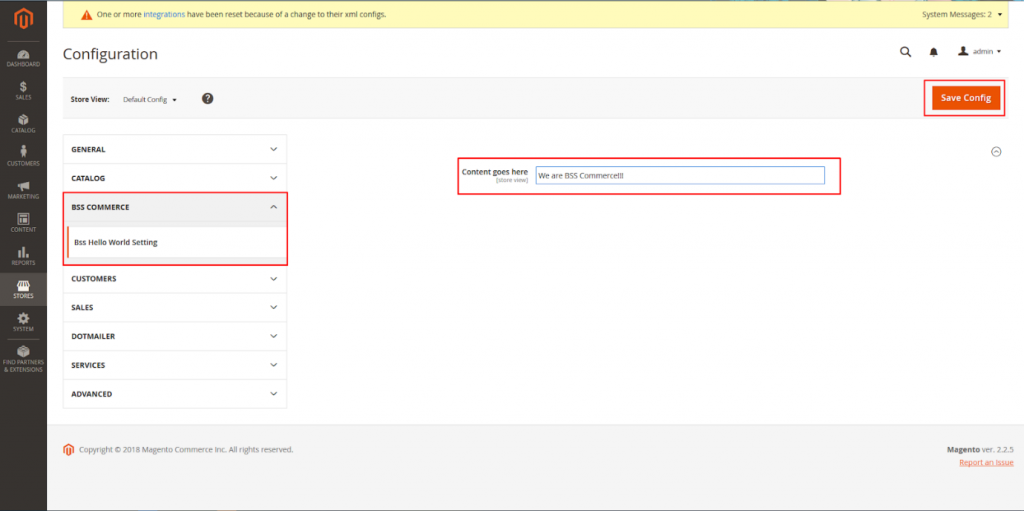
You can type new input, save and flush Magento cache to get a similar result.
Simple 5-step instruction, which we mentioned above, will help you to create Magento 2 hello world module with ease.
However, have you not had a chance to create Magento extensions?
Let’s scroll down and collect the best practices to make sure of the quality of your created module.
Best tips to create a Magento extension
In this Magento 2 extension tutorial, we will give you both the detailed instructions to build your extensions quickly and pro practices to ensure that your Magento 2 extensions are well-coded and high quality in the marketplace.
Moreover, creating Magento extension will be easier by using these tips below, even though you are not an expert in this field.
Step 1: Get to know Magento coding standard
Bear in mind that when you start creating a Magento 2 extension, you need to know about the PHP coding standard. This will help you to publish and get paid for your module.
To automatically enforce these standards, the Magento team recommends using PHP_CodeSniffer where possible or ensure that the extension has already been under a rigorous code review.
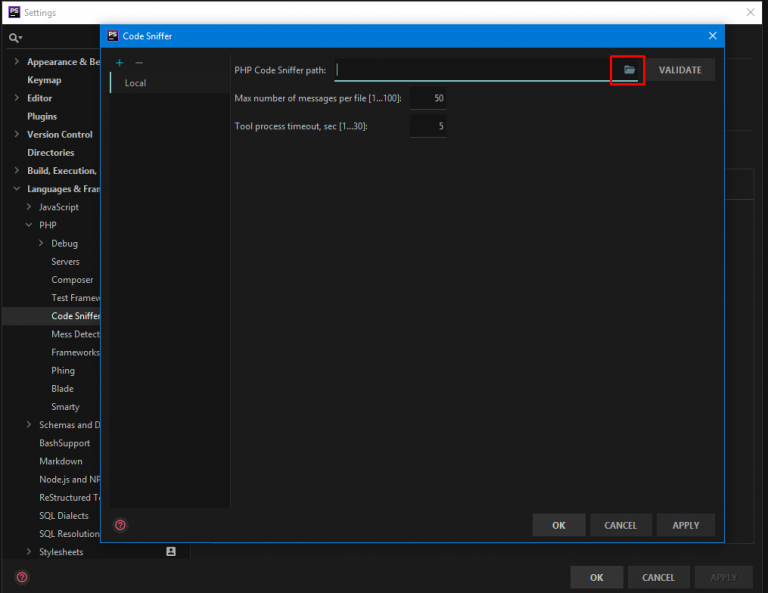
Step 2: PHP_CodeSniffer Installation
Follow the attached and useful guide in PHP_CodeSniffer to install it. On completing, please go to File ⇒ Setting. In the Popup, navigate your way through Language and Frameworks => PHP => Code Sniffer.
In Configuration, select Local and click on “…” then Open File in the popup as below:
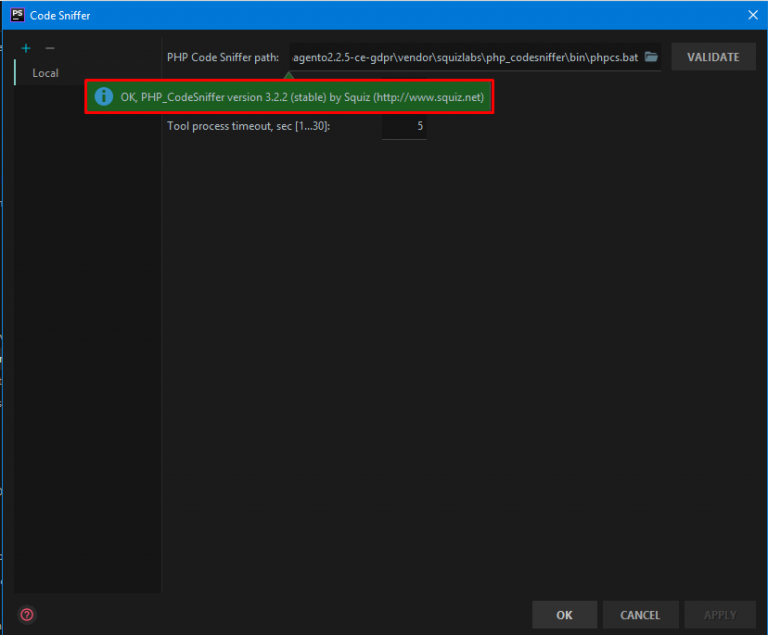
Find the path magento2\vendor\squizlabs\php_codesniffer\bin\phpcs.bat in the root folder of Magento and select OK. To check, click the Validate button.
Note: This PHP_CodeSniffer Validation setup should be done when PHPStorm is installed.
Then, go to Editor=>Inspections => PHP => Quality tools => PHP Code Sniffer validation and tick on enable box.
In Coding Standard, select Custom and click on “…”.
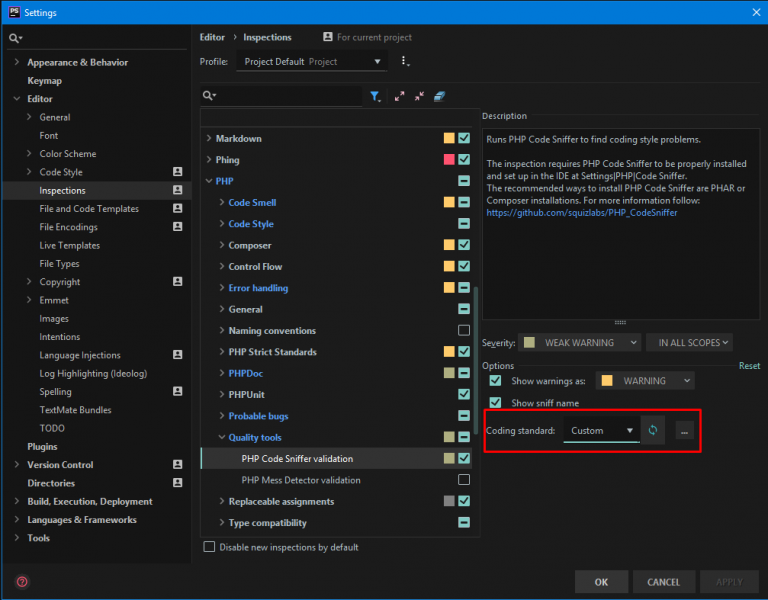
Here you see a popup be displayed, please open file. In Magento root folder, navigate to the following path: magento2\dev\tests\static\framework\Magento\ruleset.xml.
Hit OK to have the path automatically filled in the popup.

Finally, click Ok and turn off the Setting box. PHP_CodeSniffer is ready to check the code entered continuously. If there is something wrong with your code, messages will be.
Recommendations:
- Always enable the CodeSniffer, even if the code is simple and easy to fix so that you can detect the errors quickly without wasting time to check the code later.
- Setup Git as soon as you have created the code folder to create Magento 2 module. That way, you can keep your eyes on the code development process, avoid loss, meanwhile saving resources.
We will give an example by checking the app/code/Bss/HelloWorld/Block/HelloWorld.php
Step 3: Prepare MEOP Tools To Check Magento 2 Extension
EMEQP (Magento Marketplace Extension Quality Program) is a set of coding standards that are applied by Magento to make sure the quality specifications of the Magento 2 extension before putting it on sales on the Magento Marketplace.
In this section, we will introduce to you a helpful toolkit that supports the validation of MEQP violations during the Magento 2 module development.
Installation:
- Download the archive or clone from GitHub EMQP link toolkit
- Unzip and save the folder
The tool can:
- Advise to fix bugs
- Check the Magento coding standard errors in the PHP files of the extension
- Notify the type of errors and their places
- Important to note: The error with the severity = 8 and above is required to fix
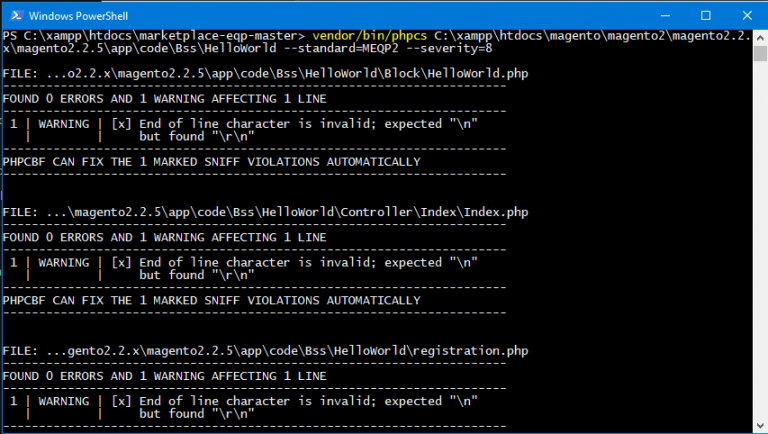
Terminal and command line
In the root folder of Magento, open the CMD/Window PowerShell by holding Shift + Right Click, then select Open Window PowerShell.
Command line:
vendor/bin/phpcs
C:\xampp\htdocs\magento\magento2\magento2.2.x\magento2.2.5\app\code\Bss\HelloWorld –
standard=MEQP2 –severity=8
In which, vendor/bin/phpcs is the command, C: \ … is the path to your extension code folder. Press enter to see results:
For example, let’s break down into the error with the severity=8
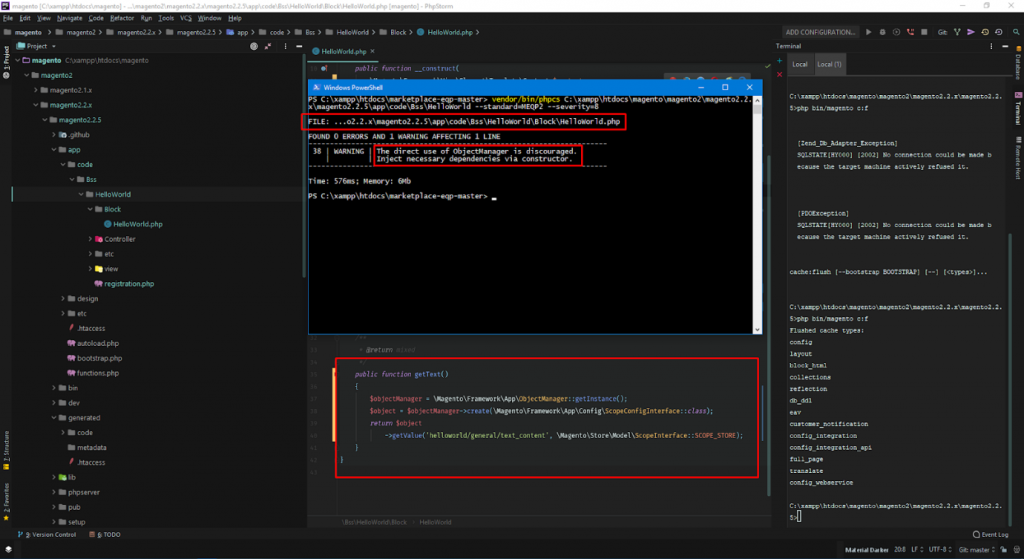
MEQP toolkit reports a bug at the 38th line in the \app\code\Bss\HelloWorld\Block\HelloWorld.php, along with a specific message: “The direct use of ObjectManager is discouraged, Inject necessary dependencies via a constructor.”
It is important to note that using Object Manager to call the functions directly will affect the quality of the extension as well as Magento 2 logic and software architecture.
With such a common error, MEQP suggests using Dependencies Injection on the __construct() function rather than use Object Manager directly.
Wrapping up
This is all Magento 2 extension tutorial for creating Magento extensions you need to know if you are interested in it.
We hope that after reading this, you have more knowledge to become a Magento extension tutorial developer in the near future.
If you have any questions, feel free to let us know!