
Magento 2 admin grid tutorial is such a good document that can provide for you a clear vision about Magento 2 admin grid. For example, you can record all orders in a table so that you can take control of all of them easily.
Sometimes, you even desire to change the appearance of your page according to your preference. You have tried many ways to carry out such things but failed!
Fortunately, we will give you all the information to do it.
Get started!
What Is Magento 2 Admin Grid?
Magento 2 admin grid, so-called admin workspace, is a kind of table that lists the items in your database table and provides access to all tools, data, and content that you need to run your store.
Many Admin pages have a grid that lists the data for the section, with a set of tools to search, sort, filter, select, and apply actions.
The default start-up page can be set in the configuration and by default, the dashboard is a startup page for admin.
However, you can choose any other page to appear as the startup page when you log in. If you want to return the Admin startup page, just tap the Magento logo in the Admin sidebar.
Magento 2 Admin Grid Tutorials for Beginners
In this section, we will give you detailed instructions about using the admin workspace effectively and quickly.
Change the admin startup page

- On the admin sidebar, go to Stores => Settings => Configuration
- In the left side panel under Advanced, choose Admin
- Expand
 the Startup Page section
 - Set the startup page you want to appear first when you log in the Admin
- When complete, click Save Configuration
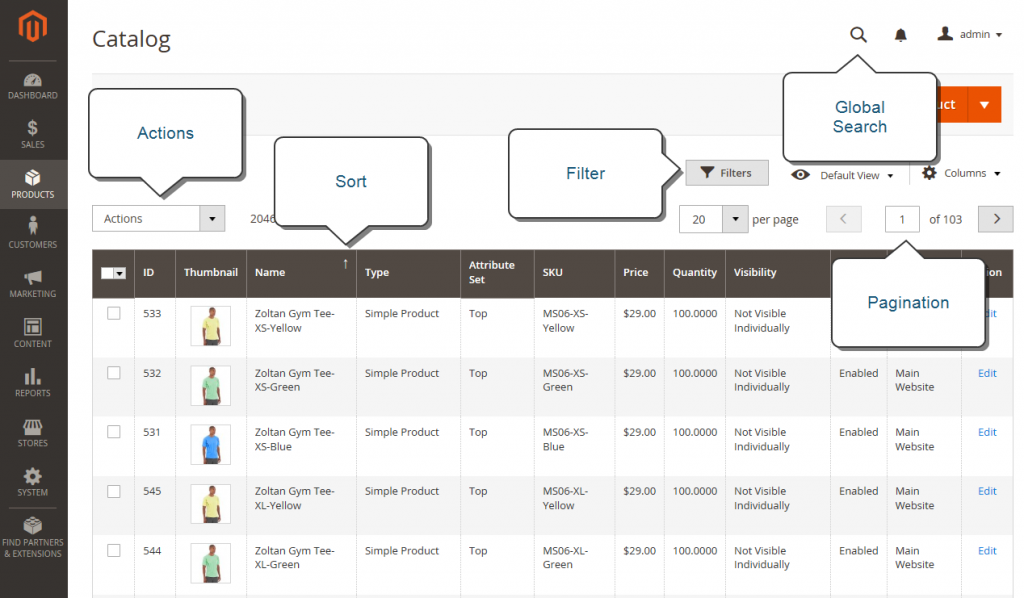
Grid controls
Admin pages that manage data display a collection of records in a grid.
Furthermore, the controls at the top of each column can be used to sort the data.
The current sort order is indicated by an ascending or descending arrow in the column header.
Moreover, you can specify which columns appear in the grid, and drag them into different positions and also save different column arrangements as views that can be used later.
The Action column lists operations that can be applied to an individual record.
In addition, the date from the current view of most grids can be exported to a CSV or XML file.
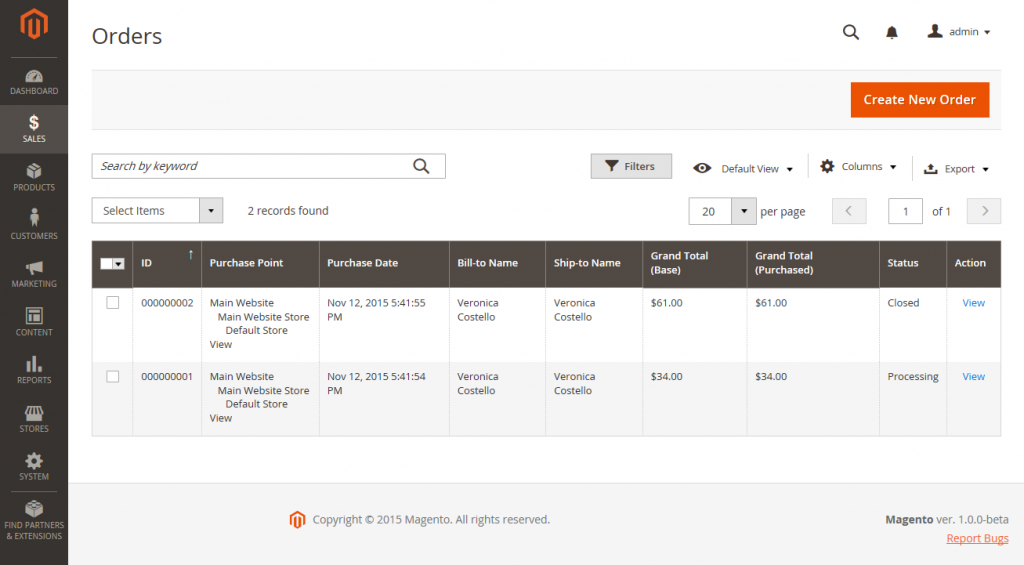
Stort the list
- Click any column header and then the arrow indicates the current order as either ascending or descending.
- Use the pagination controls to view additional pages in the collection.
Paginate list
![]()
- Set the Pagination control to the number of records that you want to view per page.
- Click Next and Previous to page through the list, or enter a specific Page Number.
Filter the list
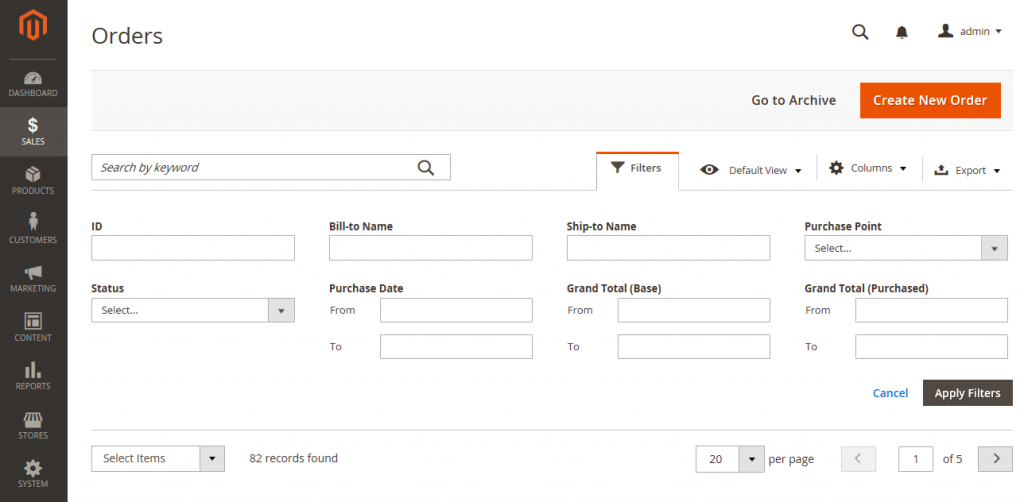
- Click filters.
- Complete as many filters as necessary to describe the record you want to look for.
- Click Apply filters.
Export data
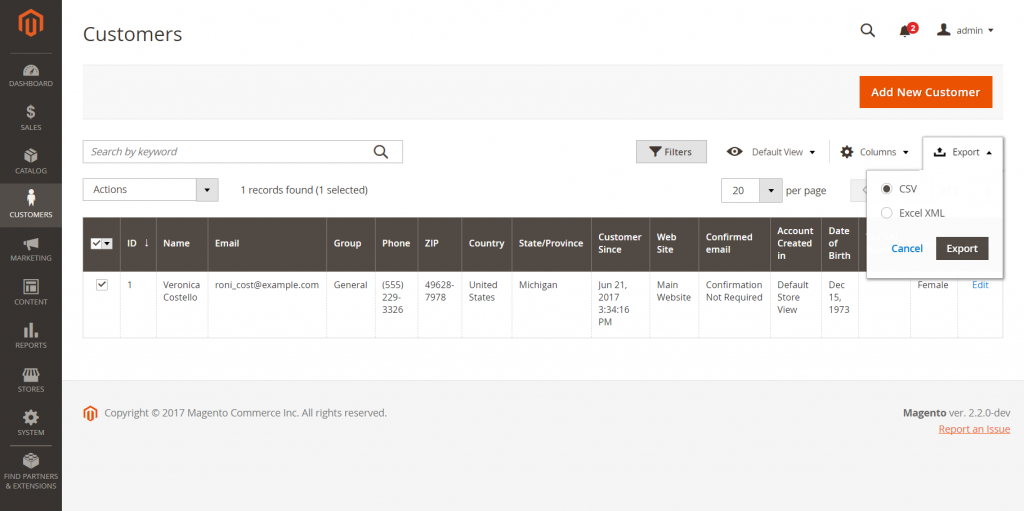
- Select the records that you want to export.
2. In the Export ![]() menu in the up-right corner, choose one of the following file formats: one is CVS and the other is Excel XML.
menu in the up-right corner, choose one of the following file formats: one is CVS and the other is Excel XML.
- Click export
- Look for the downloaded file of exported data at the location used for downloads by your browser.
Grid layout
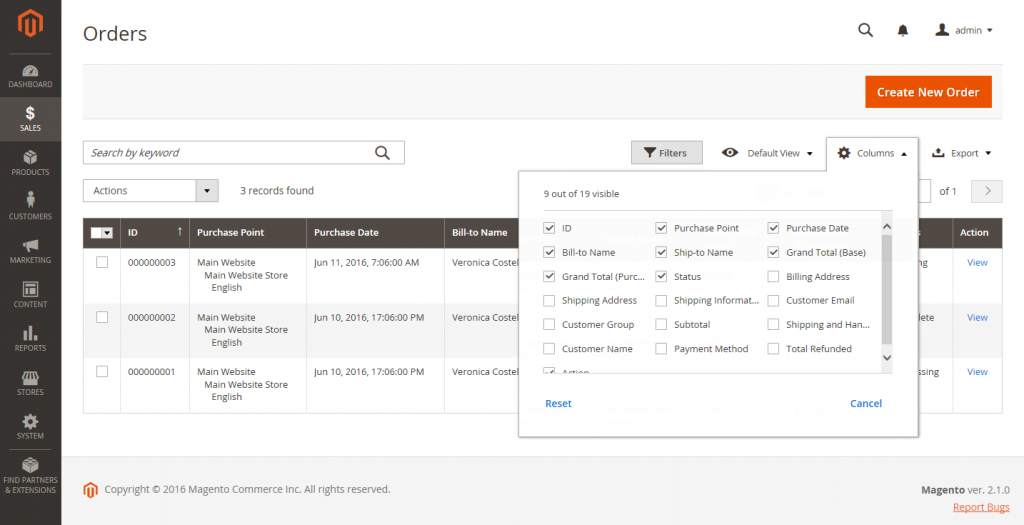
You can change the selection of columns and their order in the grid simply and easily according to your preference and then save as a view.
Keep in mind that only nine of twenty available columns are visible in the grid.
With the Magento 2 admin grid tutorial below, you can adjust the grid quickly without difficulty.
Change the selection of columns
- In the upper right corner, click the Columns
 control.
 - Change the column selections:
- Select the checkbox of any column you want to add to the grid.
- Clear the checkbox of any column you want to remove from the grid.
Make sure to scroll down to see all available columns.
Move a column
- Click the header of the column and hold.
- Drag the column to the new position and release.
Save a grid view
- Click the view
 control
 - Click Save Current View
- Enter a name for the view
- Click the arrow
 to save all changes
The name of the view now appears as the current view.
Change the grid view
- Click the view control
- Do of the following:
- To use a different view, click the name of the view.
- To change the name of a view, click the Edit (
 ) icon and update the name.
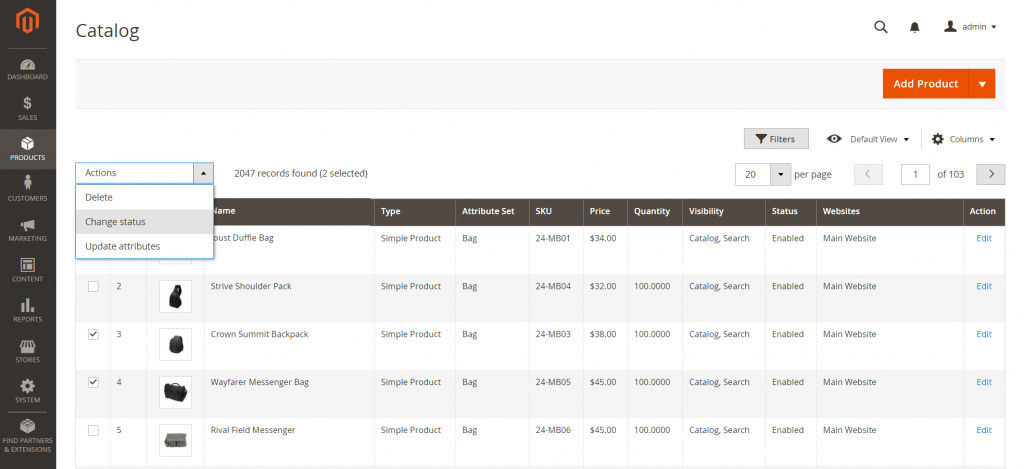
Actions control
This part of the Magento 2 admin grid tutorial you should not miss because when working with a collection of records in the grid, you can use the Actions control to apply an operation to one or more records.
The Actions control lists each operation that is available for the specific type of data.
For example, you can use the Actions control to update the attributes of selected products, to change the status from Disabled to Enabled, or to delete records from the database.
Apart from that, you can make as many changes as necessary, and then update the records in a single step. It is much more efficient than changing the settings individually for each product.
Applying edits to a batch of records is an asynchronous operation, which executes in the background so that you can continue working in the Admin without waiting for the operation to finish. The system displays a message when the task is complete.
The selection of available actions varies by list, and additional options might appear, depending on the action selected. For example, when changing the status of a group of records, a Status box appears next to the Actions control with additional options.
There are two steps in this part to complete the actions control process.
Step 1: Select records
The checkbox in the first column of the list identifies each record that is a target for the action.
The filter controls can be used to narrow the list to the records you want to target for the action.
- Select the checkbox of each record that is a target for the action. Or, you can use one of the following Actions to select a group of records:
- Select all / unselect all
- Select all on this page / Deselect all on this page
- If you want to include any records, set the filters at the top of each column to show only ones.
Step 2: Apply an action to selected records
- Set the Actions control to the operation that you want to apply
For example, update attributes
- In the list, select the checkbox of each record to be updated.
- Set the Actions control to Update Attributes and click Submit.
The Update Attributes page lists all the available attributes, organized by the group in the panel on the left.
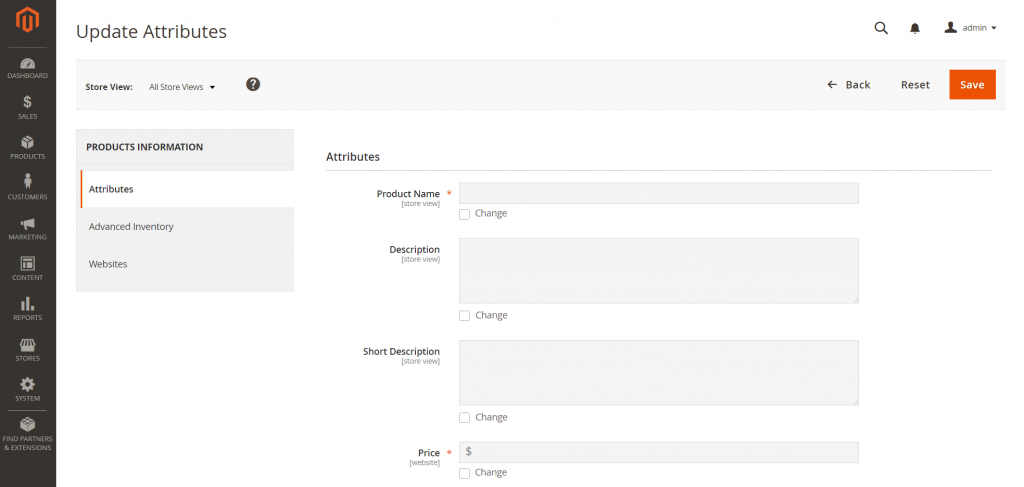
- Select the Change checkbox next to each attribute and make the necessary changes.
- Click Save to update the attributes for the group of selected records.
- When complete, click Submit.
This is all Magento 2 admin grid tutorials for beginners. If these instructions above are too easy to your level, keep reading the next section as we will show you how to create the Admin grid in Magento 2.
A Guide on How to Create Magento 2 Admin Grid Programmatically
In the next part of the Magento 2 admin grid tutorial, we will show you how to create an admin grid effectively and shortly so that you can do it by yourself without difficulty.
Thanks, MageDirect for this useful piece of code that we will mention below.
Create ACL
When you create an ACL ( Access control list rules) file to control access to our faq grid
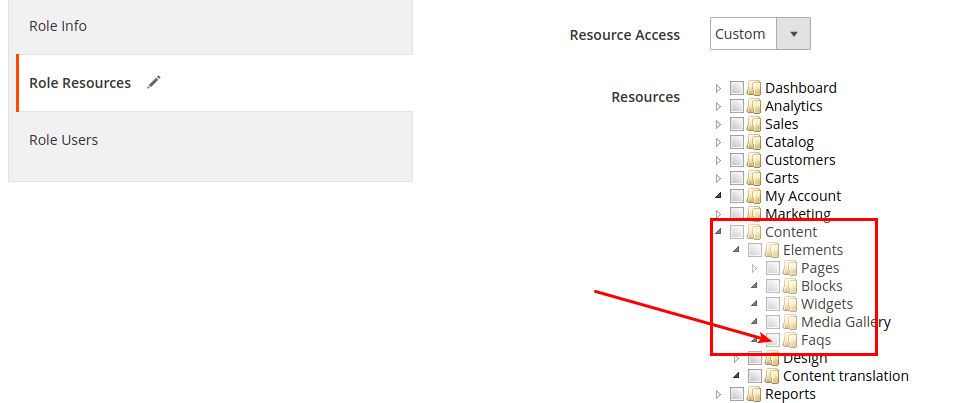
You can use this code below to carry out it:
<?<!-- app/code/[VendorName]/[ModuleName]/etc/acl.xml -->

<?xml version="1.0"?>

<config xmlns:xsi="http://www.w3.org/2001/XMLSchema-instance" xsi:noNamespaceSchemaLocation="urn:magento:framework:Acl/etc/acl.xsd">

   <acl>

       <resources>

           <resource id="Magento_Backend::admin">

               <resource id="Magento_Backend::content">

                   <resource id="Magento_Backend::content_elements">

                       <resource id="MageDirect_Faq::faq" title="Faqs" translate="title" sortOrder="100"/>

                   </resource>

               </resource>

           </resource>

       </resources>

   </acl>
</config>
Add new menu item
Add new menu item by editing etc/adminhtml/menu.xml inside the module. In this case, we will add an item under Content > Elements:
<?<!-- app/code/[VendorName]/[ModuleName]/etc/adminhtml/menu.xml -->

<?xml version="1.0"?>

<configxmlns:xsi="http://www.w3.org/2001/XMLSchema-instance" xsi:noNamespaceSchemaLocation="urn:magento:module:Magento_Backend:etc/menu.xsd">

   <menu>

       <add id="MageDirect_Faq::faqs" title="Faqs" translate="title" module="MageDirect_Faq" sortOrder="100

parent="Magento_Backend::content_elements"action="faq/faq" resource="MageDirect_Faq::faq"/>

   </menu>

</config>
“Add” directive has next attributes:
- the id attribute is the unique name in format VendorName_ModuleName::menu_name;
- the title attribute will be visible in the menu bar;
- the module attribute specifies the module which this menu item belongs to;
- the action attribute contains the url of the page on which our admin grid will be shown;
- the resource attribute is used to define the ACL rule which the admin user must have in order to access this menu item;
- the parent attribute defines parent menu item;
- the sortOrder attribute defines menu item position inside menu bar.
Add routes.xml
To etc/adminhtml folder add routes.xml file with the next content:
<?<!-- app/code/[VendorName]/[ModuleName]/etc/adminhtml/routes.xml -->

<?xml version="1.0"?>

<configxmlns:xsi="http://www.w3.org/2001/XMLSchema-instance" xsi:noNamespaceSchemaLocation="urn:magento:framework:App/etc/routes.xsd">

   <router id="admin">

       <route id="faq" frontName="faq">

           <module name="MageDirect_Faq" />

       </route>

   </router>

</config>
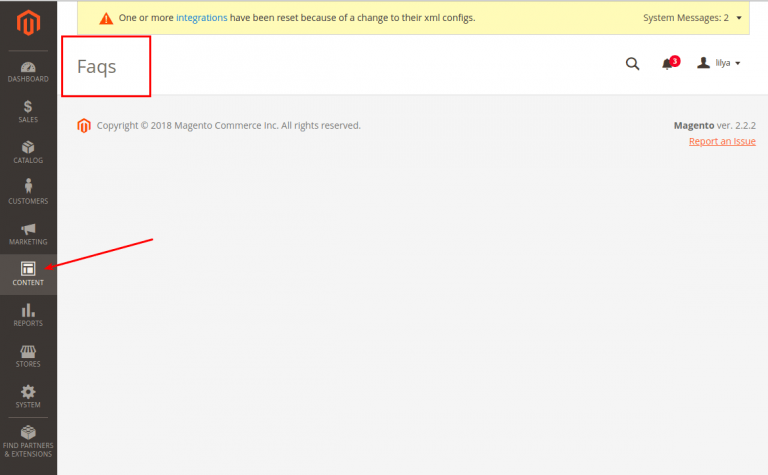
Create admin controller class
<?<?php

// app/code/[VendorName]/[ModuleName]/Controller/Adminhtml/Faq/Index.php

namespace Magedirect\Faq\Controller\Adminhtml\Faq;

use Magento\Backend\App\Action\Context;

use Magento\Framework\View\Result\PageFactory;

class Index extends \Magento\Backend\App\Action

{

    /**

     * Authorization level of a basic admin session

     *

     * @see _isAllowed()

     */

    const ADMIN_RESOURCE = 'MageDirect_Faq::faq';

    /**

     * @var PageFactory

     */

    protected $resultPageFactory;

    /**

     * @param Context $context

     * @param PageFactory $resultPageFactory

     */

    public function __construct(Context $context, PageFactory $resultPageFactory)

    {

        $this->resultPageFactory = $resultPageFactory;

        parent::__construct($context);

    }

    /**

     * @return \Magento\Framework\Controller\ResultInterface

     */

    public function execute()

    {

        /** @var \Magento\Backend\Model\View\Result\Page $resultPage */

        $resultPage = $this->resultPageFactory->create();

        $resultPage->setActiveMenu('MageDirect_Faq::faqs')

                ->getConfig()->getTitle()->prepend(__('Faqs'));

        return $resultPage;

    }

}
Clean cache
Clean cache and we will see the new empty page in the admin panel:
<?<span style="font-weight: 400;">php bin/magento cache:clean</span>
Now we can add a simple grid to this page by using UI Component. Let’s do it
Create layout files
<?<!-- app/code/[VendorName]/[ModuleName]/view/adminhtml/layout/faq_faq_index.xml -->

<?xml version="1.0"?>

<pagexmlns:xsi="http://www.w3.org/2001/XMLSchema-instance" xsi:noNamespaceSchemaLocation="urn:magento:framework:View/Layout/etc/page_configuration.xsd">

    <body>

        <referenceContainer name="content">

            <uiComponent name="faq_listing"/>

        </referenceContainer>

    </body>

</page>
Final Thoughts
This is the end of Magento 2 admin grid tutorial, we hope that you have more knowledge after reading this.
If you have any questions or trouble, feel free to contact us.
We will give you full support and solve your problem.